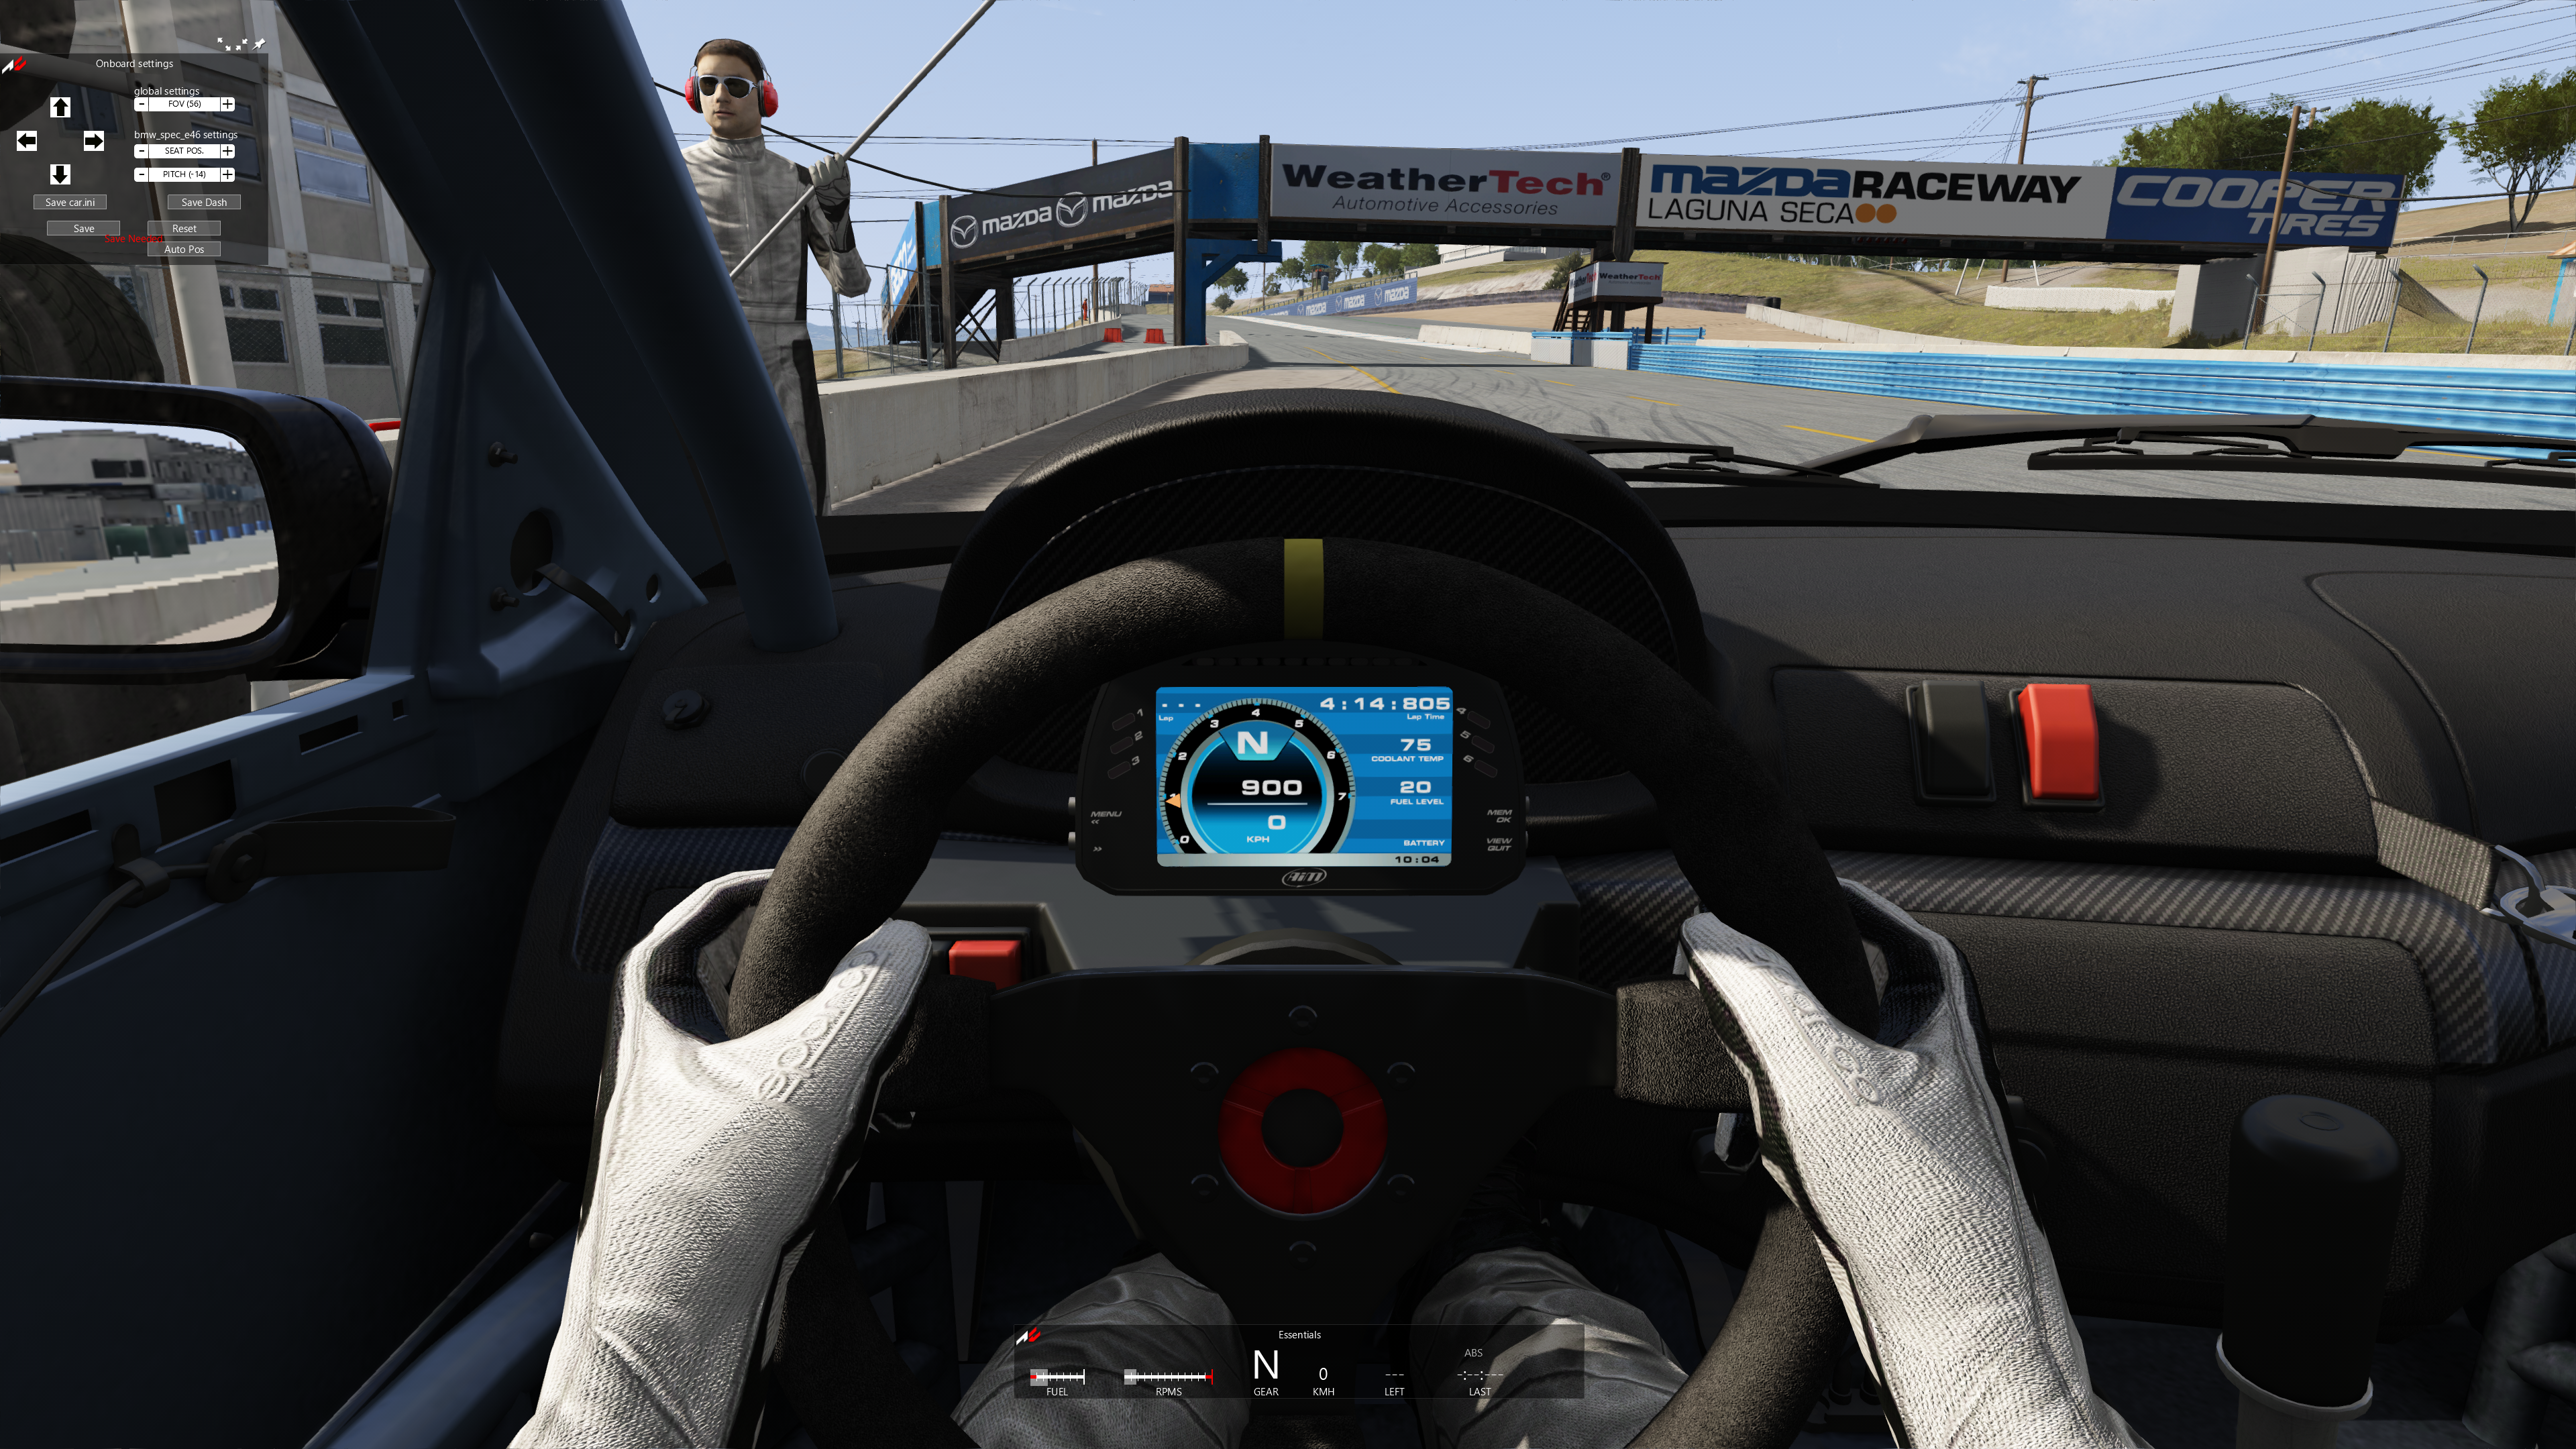
Thanks to everyone for the support on the SE46 car for Assetto Corsa. We have an updated build to share!
Here’s what is new:
Front and rear anti-roll bars are now adjustable.
The car now comes with additional base factory colors for the car. The sponsored race car livery is still the same and the default but now you have new options.
The .zip file now contains a new folder called “Templates”. This folder contains a Photoshop file (.psd) that you can use to create your own livery.
The passenger side cage tube now goes in the proper location (aesthetic change only).
Wheels now have motion blur.
Enhanced levels of details and interior is now optimized for low resolution graphics cards/monitors
The rear-view mirror has been adjusted down so it is more easily viewable when not in VR mode.
The description, power figures and graphs have been updated.
Dyno graphs are based off a real-world chassis dyno and 15% added to torque and whp for drive-train losses.
How to get the update:
For those who already purchased the car, an email has been sent (including initial contributors to the build) where they can access it and all new purchasers will get the new build in the download link. Click here to check out and buy the car!
How to install the update:
Download the update
Make sure Assetto Corsa is not running.
Right click the .zip folder and select “Extract All” – do not just double click into the folder.
Find the “contents” folder and copy that folder
Go to this path: C:\Program Files (x86)\Steam\steamapps\common\assettocorsa\content\cars
If you already have the previous version, delete the previous version of the car, which should be a folder called “bmw_m3_e46”. If not, skip this step and go to step 7.
Go up to levels in that director to: C:\Program Files (x86)\Steam\steamapps\common\assettocorsa\
Paste the “contents” folder you copied above
Close the file explorer window
That’s it!
Over the next couple months, via our friends at Track Attack, we will have the capability to log telemetry data from Assetto Corsa and compare it with the real world data we already have from several tracks. We’ll use this data to further fine-tune the physics model.
As always, let us know what you think and thanks again for the support!
With the explosive growth of simulator driving for not just training but actual competition, big time dollars and rewards attached, we get more and more questions about how to get started building a simulator setup and specifically, what to get.
Still wondering if simulator driving is really that worth it? Check out this podcast from Speed Secrets and this video about William Byron – now a driver for Hendricks Motorsports, who didn’t grow up driving karts or cars but rather, simulators.
This can be a complicated space because there are a lot of options. In this second post, let’s go down one specific path base on what we think is the most important question.
Why do you want a simulator setup? I want to use simulators to accelerate my driving or car in the real world.
eSports is exploding in popularity with games like Madden, Fortnite and Halo being at the center global gaming tournaments. Gamers from around the world train and compete against world-class gamers at in-person and virtual tournaments all over the world and for real money.
This is not a spoof! That is a real picture of thousands of people watching gamers compete on-stage!
This post is focused primarily for those who want currently or are planning to drive in the real-world and want to use simulators to accelerate their development. Getting to the track in the real-life to get quality seat time, driver coaching, and car development is not cheap. Simulators are an excellent path to do all of those things more often, at a lower cost and increasingly with direct correlation to what happens in the real world.
Recommendation: Go with a PC-based simulator like iRacing, Assetto Corsa (PC edition), Assetto Corsa Competizione or RFactor 2. Yes, Gran Turismo and Forza have had tournaments where the winners compete in real life for chances to be race car drivers as a profession but those are the exceptions.
It’s time to get serious with triple monitors and the very best components you can buy.
Things to get:
There is no way to get around it – this will be more expensive because you are trying to replicate real life, of which a lot of what happens in real life is about how the car and track sound and feel of your inputs.
A quality PC that can keep up with the display you want. The main thing here is a decent processor and ram but the beefiest graphics card you can get and the bar at this level is a little higher than at the ‘simulator only’ level. Here are a couple options:
A PC desktop with a decent i7 processor, 16GB+ of RAM and a 6GB Nvidia GeForce GTX1070 or equivalent from AMD. Get the absolute best graphics card you can get – it will be worth it.
40”+ single monitor/TV: this is not really an option. If you want to really focus on improving your real-world driving, you need an immersive experience.
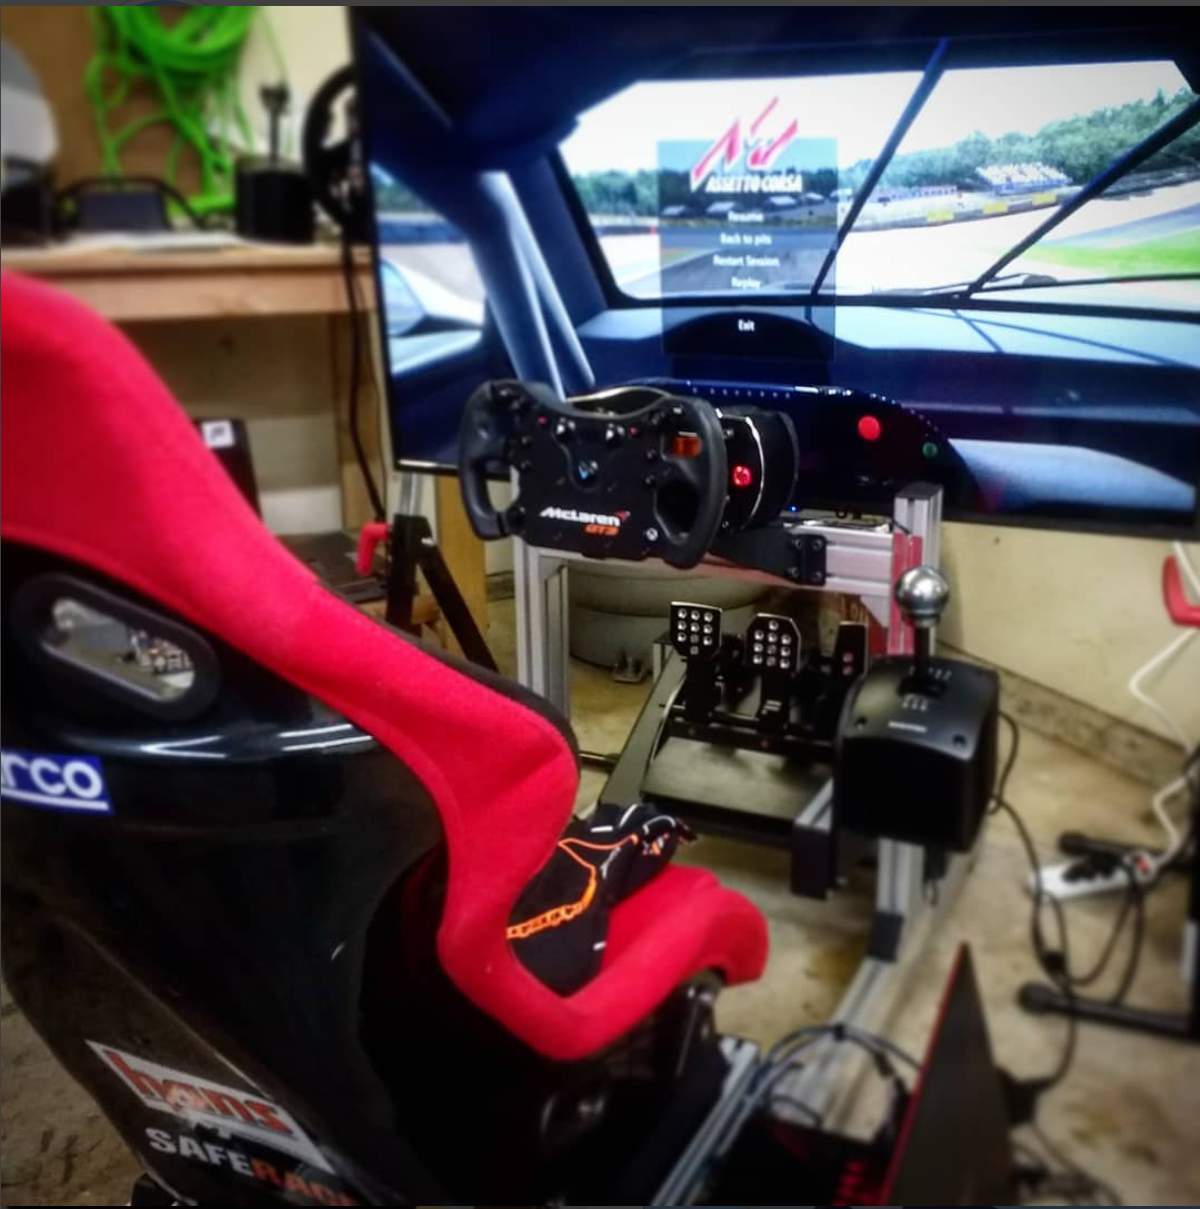
Sim rig with a seat
A sim rig/cockpit is no longer optional. You need the seating position, field of view and access to the driver controls to be as close to real-life as possible and you can only really do that with a proper and sturdy sim rig. Here are a few options:
DOF Reality – makes a very low cost sim chassis that also includes motion.
RSeat – makes all kinds of sim chassis with and without motion. Most importantly, they look very stout.
Sim Lab – we recently got a GT1 Evo chassis and are loving the sturdiness and adjustability
Motion platform
Yes, it’s now close to a requirement. Driving in race cars on tracks is a rough experience where you’re getting tossed around as you go over bumps and curbs. The feeling of the car pitching forward when you hammer the brakes, the car getting upset as you take too much curb or the backend coming loose when you carry too much speed into a corner or get on throttle too quickly – you need to feel that. All of those things in real life tell you what’s going on and they remind you of the mortal consequences of having more bravery than talent.
Want everything integrated and ready to rock? There several companies who sell fully built and ready to rock motion simulators. Here are a few:
There are few other things that will accelerate your driver development than quality motion simulator seat time.
The quality of your experience is completely dependent on the components you put into your PC and peripherals. If you want better graphics, get a better graphics card. Want better FOV, change your display setup. Want an even more immersive motion experience with real-time data streaming and coaching? You can do that too!
The force feedback and vibration capabilities of the steering hubs and transducers on the market are amazing. You can buy components and configure then so that you feel everything on your feet, butt, abs, legs and hands as you do in real life. You will have a generally authentic steering input and feedback experience.
There is a growing number of retail locations where you can rent seat time on very high-end simulators and get coaching from top-level coaches.
Cons:
No longer “welcome”, you are right in the middle of the slippery slope! It is now the cost of a small car to get a decent motion simulator up and running. It starts in the $5-10k range and goes into the $50-75k range. There are simulators well above those ranges but those are reserved for commercial applications.
Driving consistently well in a simulator is hard and even more difficult with motion. Most people are lucky to end their first 30 minutes in a simulator simply not crashing or losing control. Stick with it!
Pretty much everything is more complicated to setup. There is almost no plug and play experience for any component. You need to connect them, install drivers and configure/calibrate.
The physics and tire model are better than the console world but vary across simulator platforms.
There is even more you can buy, which can be good – for example, buttkickers are sound based vibration devices that give even more feedback to the seat, pedals and generally corners of the car.
Example setups: I’ve only built one motion rig and would be considered “entry level” for a quality motion experience.
Example 1: Entry level, motion with a rig: Everything here is exactly what I have on my current motion sim but my graphics card cost a bit more a year ago than they do today.
Total Cost: $8,741.39 (doesn’t include taxes or shipping)
Custom built desktop gaming PC w/Nvidia GTX1080Ti: $1,200
iRacing subscription: $80/year
SimXperience Accuforce Hub and steering wheel w/button box: $1,299.00
If I knew then what I know now, what would I do differently?
The Next Level Racing cockpit is pretty good, and I don’t entirely regret my purchase decision, especially because their motion platform integrates seamlessly BUT if I were building another rig (which I will in the next 6 months or so), I would try the DOF motion cockpit because I don’t love the following about the Next Level Racing cockpit:
The flex in the chassis, especially under heavy braking. First, it flexes and since it wasn’t designed to flex in the first place, the amount of flex is variable. This isn’t great when you are trying to hit your marks lap after lap or making minor adjustments to brake application to shave off tenths of seconds.
Lack of adjust ability. Having the seating position, steering wheel, shifter and pedals in the perfect position for your body is critical to driving fast and driving consistent. Any unnecessary mental energy used to figure out where things are or having to adjust to not having the controls in natural/intuitive positions will make you go slower. The NLR rig is essentially fixed in place after you set things up and for me personally, we had to add a wood block to the pedal box so that my heels could stay planted and reach properly. The manual shifter position is okay, but I really wish I could move it another inch or two closer to me. Lastly, with the motion set, the slider doesn’t work.
You listed the Fanatec pedals but you have some other fancy looking pedals. What gives?
Yes, when the Thrustmaster wheel hub failed after about a year of use, I upgraded to the Fanatec hub but I wanted as close to the real-world race car pedal feel as possible. On this rig I currently have the Derek Spears Designs pedals which are amazing and use real Wilwood racing pedal box components. You don’t need these if you are only simulator racing. I also have two other rigs with the Fanatec V2.5 Clubsport pedals, both the floor mounted and the hanging configurations. They are solid and when you add the bump stops for the brake pedal, they are close to the DSD pedals but still substantially lower cost.
With the explosive growth of simulator driving for not just training but actual competition, big time dollars and rewards attached, we get more and more questions about how to get started building a simulator setup and specifically, what to get.
Still wondering if simulator driving is really that worth it? Check out this podcast from Speed Secrets and this video about William Byron – now a driver for Hendricks Motorsports, who didn’t grow up driving karts or cars but rather, simulators.
This can be a complicated space because there are a lot of options. In this first post, let’s go down one specific path base on what we think is the most important question.
Why do you want a simulator setup? I just want to have fun!
I want to have fun: Many people simply want to drive some awesome cars and a variety of tracks, without taking things too seriously. You don’t care or want to bother with dealing with things like tire pressures, spring rates, shock settings, etc. You want to jump into a simulator, start driving, sliding and maybe even trade some paint with others or barriers, on your own. Best of all, it’s the cheapest way to get into simulator driving.
My brother and I getting some laps in on Gran Turismo.
Recommendation: Go with console-based simulators like Forza, Gran Turismo, Project Cars and Dirt.
This is optional because there’s several ways you can get your steering wheel base setup mounted to a desk, with the monitor right in front of you.
It’s best to have your pedals secured onto something so you can really work the pedals but in most bases, just having them wedged against something on both sides and the back is good enough.
Pros:
Console-based simulators are generally of super high-quality graphics in the cars and the tracks.
The tracks are essentially what they are like in real-life, it’s a great way to learn a track.
Tons of cars. Everything from high-performance street cars to Formula 1 cars.
The force feedback capabilities of the Fanatec and Thurstmaster lines are great and good, respectively. You will have a generally authentic steering input and feedback experience.
A great tool to focus on your getting your eyes to look far ahead and get ahead of what the car is doing.
Getting a console is much less expensive than building a gaming PC and the there are some lower cost peripheral options from Fanatec. See our shopping list below, where you can get started for under $1k USD!
Cons:
Relative to iRacing, the quality of online racing against other real people is not great. People complain about getting crashed into at the rookie and lower levels of iRacing but online racing, outside of some of the bigger tournaments on Forza and Gran Turismo can be downright horrible.
The physics and tire model are simply not as good as iRacing, RFactor and Assetto Corsa.
Limited triple screen options. It is doable to get a triple screen setup but it’s much more complicated and expensive. A better option would be a large curved screen or virtual reality headset.
Aside from the Fanatec Clubsport V2 and newer pedals, the pedal options are not great. Specifically, is the feel from the brake pedal. Braking is what separates the good from the great and having a realistic and consistent braking feel is critical. Most of these console game quality pedals have limited resistance and you essentially train your braking based on the position of pedal, not the pressure and feedback from the pedal.
There are options to add a rubber bump stop to the brake pedal (of which I did to my Thrustmaster setup) which makes things better but still not as great as some of the high-end PC only brake kits.
Quality – this may have improved but just simply the quality of the components is not great. I was using the setup pictured below to really work on my driving, so I was put on hundreds of hours on the components per year. If I recall correctly, the Thrustmaster steering wheel base lasted just over a year before it just stopped responding one day. That was when I decided to upgrade to Fanatec and shift to a PC simulator and iRacing.
Example setups:
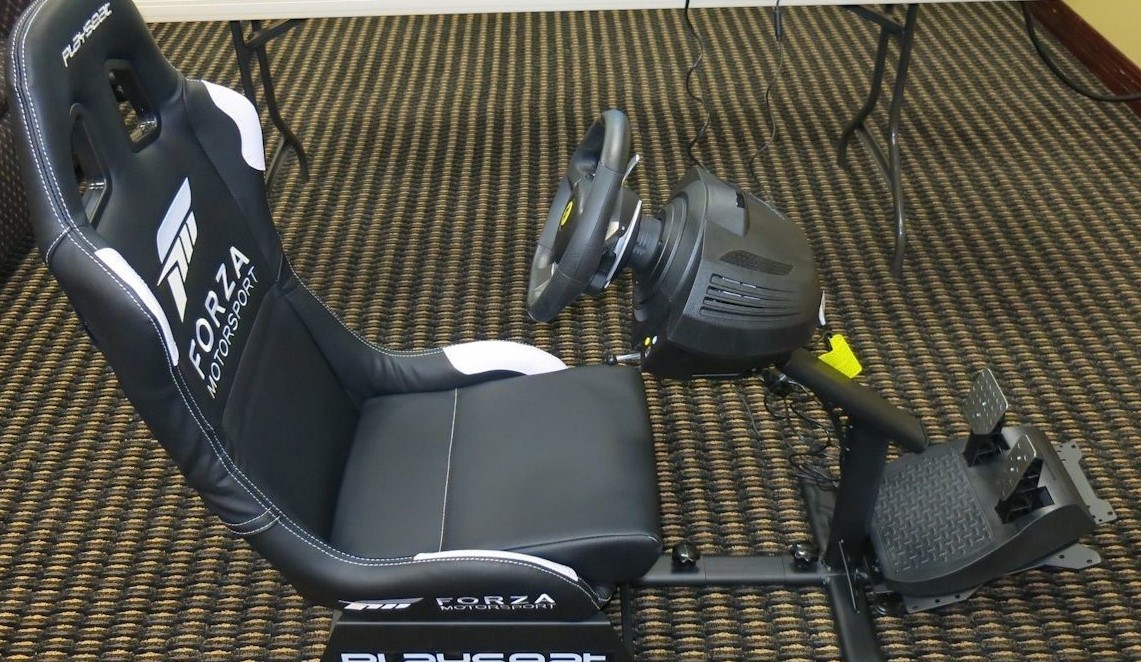
Thrustmaster, Forza and Xbox One: This was my first “simulator” setup going back to 2012 or so. I felt a little intimidated with getting into PC-based stuff, so between a Christmas present from my in-laws, my wife and my own purchases, I had a decent Forza based setup. I spent hours working on fixed setup time attach competitions, primarily in a Mazda Miata and trying to build the cars I had in the real-world, in the game (Mitsubishi Lancer Evoluiont 9). All in, this setup cost about $1,200.
Total Cost (assumes you already have a TV): $1,428.76 + S/H + Tax w/PlaySeat. Under $1k w/out Playseat.
Xbox One S Forza Motorsport Bundle: $389.99
Thrustmaster VG TMX PRO Wheel, Base and pedals: $321.81
Thrustmaster TH8 shifter: $217.96
Playseat sim rig: $499
Yes, that is the pedal set taped down to the floor base.
Memories of me working my tail off to move up in the leaderboards.
For about a 3-month period I had a Gran Turismo and PS3 setup with a Logitech setup but it wasn’t any better than what I had with Forza so I sold everything off. Total cost was right around the same as the Forza.
Do you have an awesome console based sim set up? Post some pics in the comments!
Check out future posts on two other paths:
I want to get serious about simulator driving: This means you don’t care at all or much about driving in the real-world. You are all-in on simulator driving.
I want to use simulators to help me be a better driver in the real world: This means you currently or plan to be driving on track in the real-world and you want a simulator to help with driver and car development
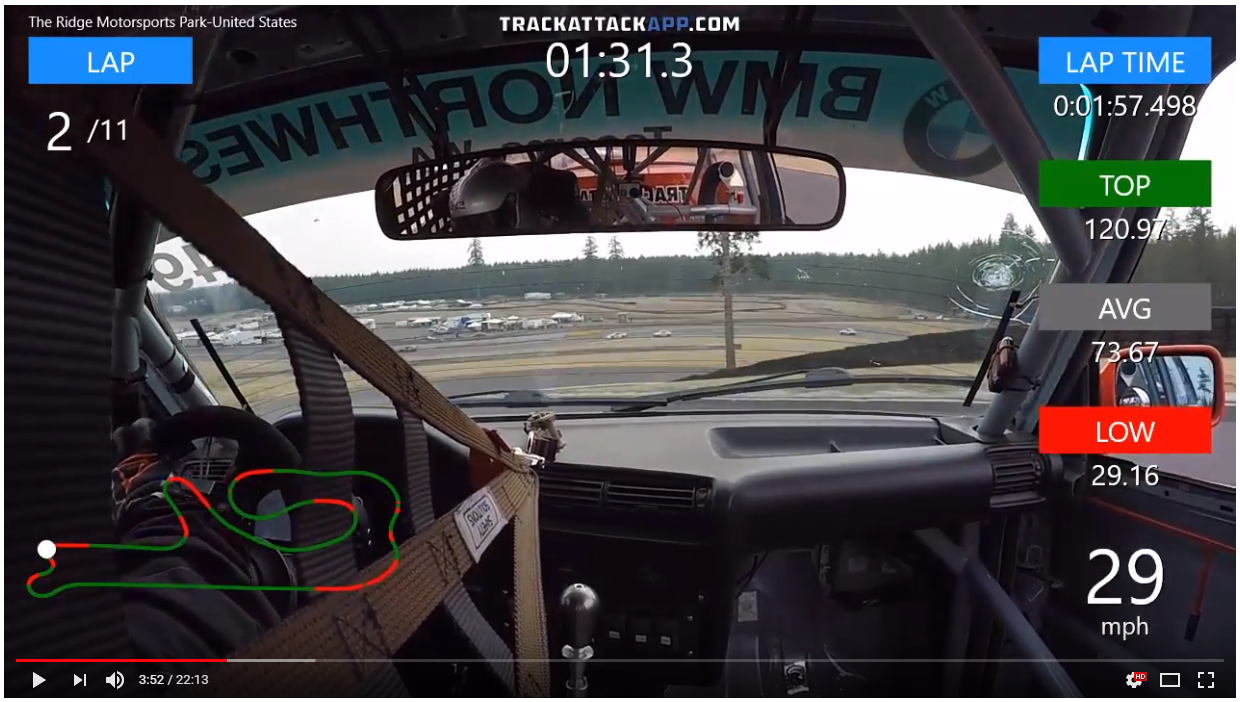
Welcome to The Ridge! The Ridge is the newest track in the Pacific Northwest that is generally available to the public (Vancouver Island Motorsports Park opened recently but is a private track).
We’ve also broken the track down into 6 segments, each segment is defined right before the major major braking/slowing down zones.
Braking a track down into sections, makes it easier for people ‘consume’ it and prioritize where to get focus.
Before you read on, watch this complete lap from a dry race in September of 2017. Read the article and the re-watch the video.
Segment 1: The Uphill
This segment starts at s/f and goes all the way up to the first major braking zone (not including braking for T2) entering the Carousel. The first thing here is that this segment is a 76ft climb in elevation. The equivalent of an 8 story building. Yeah. So every single loss of mph as you make your way up the hill, will be penalized with a multiplier as you go uphill – keeping the momentum going is a top priority.
Momentum is important – check! Turn 1 – get ready for a trouser check. Turn 1, in some cars, can be taken flat, without lifting. This is similar to T1 at Spokane but the distance between T1 apex and turn-in for T2 is not as long, so in cars that are faster than a Spec Miata, experiment with caution. Personally, the most I’ve ever been able to get away with is a ~4/10 braking effort – just a tad more than a brush of the brakes, go back to tad of maintenance throttle and then back on the brakes, about the same amount for the downshift to 4th gear and then going back up the hill.
As you get the car past the apex of T2, it’s really important to get close to the curb of T3 but don’t take too big of a bite off of it, as it will send your car back to track-left, which is not the ideal line for the remainder of the complex. Once you get to full-throttle, you absolutely cannot lift. After T3, stay track-right, to setup a wide arch into T5 and then release the car to driver’s-right. This whole time between T3 through T5, when you’re pinned to full throttle, you will feel the back end wanting to step out. That’s ok – simple counter steering corrections (small ones), while staying flat, will take care of them.
After this, it’s smooth sailing to The Carousel – find a straight line to follow, that will set you up on track-right, for T6 (The Carousel), which is a long, flat left-hand sweeper.
Segment 2: The Carousel
This segment is just one corner. Why? It’s long and hard to get right. This corner can be taken many ways but here is one that has proven well in racing and qualifying conditions. Set yourself up track right but not necessarily right on the edge of the track. Brake a little later than feels comfortable with a solid 6-7/10 effort and after the initial bite, start trailing off and turning into the corner, like if you were trying to double-apex the corner.
The backend may start to come out as you turn-in so get ready to catch the backend with some maintenance throttle. Try to keep the car tucked in tight to the inside edge of the corner and if it washes out a little mid-corner, that’s ok and that just means you can back on throttle even more aggressively for corner-exit, because you don’t need as much steering input.
Don’t mind what looks like me driving off the course, that’s just a natural occurrence of margin of error of GPS signals and the stitching together of satellite images for maps.
About 35-40% through the corner, you want to be on-throttle and free here on out, you don’t lift. Start your ascension to full-throttle and as you feel the backend come out, pause the throttle application and give it a steering correction but DO NOT LIFT! For me, there is a single, tall tree out in the horizon of this corner and the instant I see that tree, I go full-throttle, no matter where I am.
From here, let the car release all the way to track-right, the very edge if needed. A lot of people don’t get out here because they want to setup far left for the next segment and that’s a trade-off you can decide to make.
Segment 3: The Thumb
This is one of the trickiest parts of the track. It combines a big compression and low-speed traction event at 8a and 8b but also a super hard, decreasing radius turn at T11 (aka The Thumb).
As you come out of The Carousel, it’s ok to stay driver’s left and then draw a straight line as you go downhill at 8a. Stay on throttle until right before you feel the ground fall away, lift and synchronize the compression event with your braking. When you do this right, you don’t need to brake as hard because the compression event gives more bite to front-end. Downshift (if you have to), wait for the car to rotate a tick and then get back to maintenance throttle. You want to get on full throttle here as quickly as you can but the sliding plus the acceleration means that it will be really easy to get on-power over-steer, so be aggressive but careful with your throttle application. After you get to full throttle, it’s a full throttle ride all the way up the hill, which is another 36 foot climb (almost a 4 story building). Every mph you unnecessarily drop or every split second of having to lift from throttle, will make you pay dearly at the top of the hill.
Where you brake for the thumb will be determined by the car and how fast you’re going. In a PRO3 car, the engine is spinning at 6,500RPM and ~103mph and we wait to come off throttle just before the curbing on the left and are well into the brakes at those curbs.
You don’t need to track all the way to driver’s right to setup for the thumb, about mid-track is fine in most cars. Next, is one of the hardest corners to get right – find the late apex and make it your job to hit that curbing with your LF tires. Getting on those tires, in 3rd gear (in many cars, 2nd gear in Spec Miatas), means you can get on the throttle hard and have plenty of room on the exit of the corner. Be ready for the car to wash out and go on the exit curbing and maybe even drop a rear tire on the exit of the corner but that’s ok – DO NOT LIFT!
Segment 4 & 5: The Ridge Straight
I’ve broken this segment into two segments because it contains two corners, which are taken very differently and I wanted to leave the last segment being the last corners before the front straight away.
First is the very deceiving Turn 12 right-hander. It’s deceiving because you can actually car a good amount of speed here and the corner opens up quite a bit on the exit, which means there is a plenty of room for corrections if you maybe got on-throttle too early.
The trick here is to get to the apex and be on full-throttle at the apex. There is a bump or bulge right at the apex, which will feel like it kicks your car away as you hit but get to full-throttle, stay in it and ride it out. You’ll almost for sure have the car sliding a little just past exit – a simple steering correction will get it back under you and you can keep going. Then start making your way over to track-right, to setup for the Ridge complex.
As you approach the corner, you’ll see that the ground starts falling away in the middle of the braking zone – YIKES!!! This means you have to have your heavy braking done before the ground starts falling away. Looking at the data, the drop-off is a 7 foot decline in elevation over a 150 foot distance. 150 feet when you’re travelling at 75mph, goes by pretty fast, so this is a split second decision.
As you approach turn-in for the corner, stay on the brakes ever so slightly, so that when you turn in full, the noise is loaded up and will help rotate the car. It’s ok to bite off a little bit of the curb but don’t get over zealous.
Give it some throttle as soon as you get past the corner, turn for the right hander and stick to track-right as much as you can. If at all possible, stay off the brakes but you might need to brush the brakes to help the front-end bite.
Segment 6: The Front Straight
The lap is almost over! You’re barreling down the Ridge Complex, a nearly 80 foot drop and you need to decide what to do for the last corner before the main straight away. There are couple school’s of thought:
Geometrical fastest line: Swing out wide, carrying more speed because you have a wider arc, a single late apex at Turn 15 and then pin the throttle down until start/finish.
Shortest distance line: Stay a little closer to the inside, use the banking in the corner, travel less distance and hit the apex of Turn 15 at the same spot.
This really depends on what kind of car you have and the track conditions on the outside of Turn 15. In race weekends, that wide line isn’t used much, so there ends up being a lot of marbles out there. Great for the rain but not for the dry.
At least in a PRO3 car, we have more grip than power, so as is with many of the other corners, the less distance we have to travel, the better so Option 2 is what you’ll see in the data.
Now, I can totally see an argument even for a PRO3 car to setup for a single flying lap to go super wide, throwing away the lap time for that current lap and setting up for a higher top speed going into Turn 1 or even setting up a competitor for a pass at the end of the straight.
You’ll see in the data that I’m on throttle about mid-corner and full-throttle at about 3/4 of the way of the corner. After that, it’s about finding the straightest line possible through Turn 16 and the least amount of steering input all the way down the front straight away.
Conclusion: The Ridge is awesome. Go drive it!
The Ridge is really a fun track. Newer and well take cared of pavement and plenty of run off room in most corners. You can get in trouble and it makes you pay but most of the time, it’s dirt and rocks on your car to go along with a bruised ego.
The facilities are constantly improving and with a motocross and a kart track that is a mini version of the big track, there’s few places that can compare. The downside is that it is located about 30 minutes northwest of Olympia, WA and Shelton has limited hotels but coming out in an RV or camping, is an absolute blast. Best of all, there are no drag races so every evening, you can do a complete track walk.
In a couple weekends, we’re headed back to Portland International Raceways and the first time I’ll get to drive the track for more than one session (in real life) this year and since I was on the Speed Secrets Podcast, earlier in the spring. I got some live coaching from Ross Bentley and have been excited to implement the tips I heard. Check out the podcast episode here and subscribe – it’s an awesome podcast with a wide variety of guests and every time, I learn a ton.
So let’s take a lap around the track and go through each sector as defined by the sectors on Track Attack. Below we’ll be using illustrations from real data from a pair of front-running “spec” racing class cars: my PRO3 and Will Schrader’s Spec Miata. Both are considered low-power momentum cars but there is enough power and weight difference you’ll see different things happening.
If you are a Spec Miata or PRO3 driver in the Pacific Northwest (or have similar cars), you can request to join the respective teams on Track Attack and get access to the session data that we’re using in these examples. (Link to PRO3 data share team and Northwest Spec Miata Tour)
We’ve broken up PIR w/chicane into 4 sectors. Each sector is a combination of corners and are split halfway through a ‘straight away’.
Elevation change: None
PIR is like the Lime Rock Park of the west coast. In the chicane configuration, there are 7 right hand turns, compared to 2.5 left hand turns. But unlike Lime Rock, the elevation change is near zero. Check out this video where the data overlay shows the elevation change – there is just under 10 feet of total elevation change.
No real elevation change but there are still some tricks on banking that the track holds.
Segment 1: The festival chicane
The first segment starts at the start/finish line, of which the speed that is carried before the first braking zone is determined heavily by the exit out of T12 on the previous lap and if you might have caught a draft down the front straight.
Braking for T1 will depend on the car and whether its a qualifying lap or a race lap. In a PRO3 car and a qualifying lap, you can hit the brakes hard right after passing the 400 board and what ends up being right before the 300 marker. Note, this is hard to replicate lap after lap. After hitting the brakes hard, start coming off of them and you should already be looking for the apex of T1. It’s a good practice to put the right-side tires on the FIA curbing at the apex of T1 and even dropping a tire inside of the curbing isn’t bad but puts more stress on the suspension components.
Think about this: When are you releasing the brakes as you enter the corner for T1? Play around with that.
You’ll want to take a line where you can hit T2 with a late apex. Why? There’s a decent straight-away from full-throttle at the exit of T2, all the way until T4. Focus on doing what you can to get to full-throttle as soon as you possibly can coming out of T2. Usually when I see data of someone really moving through this segment, it is all about the minimum speed they carry through T1 and how quickly they can get to full-throttle out of T2. Clearly, there is a trade-off here but that’s the trick – finding the right balance and compromise for you and your car.
Also, the steering input for the change in direction to turn for T2 is relatively abrupt and hard. Remember, slow speed –> fast hands, fast speed –> slow hands.
Comparing the lines of two front-running cars: Blue is a PRO3 car and Yellow is a Spec Miata. What differences do you see?
Segment 2: No rest – Attack!
Segment 2 includes T4 – T6 and is one of the areas that separates good from great laps. It can be easy to coast through this segment, but when you’re looking for the maximum lap time, you need to attack!
Same two cars: Yellow (Spec Miata) and Blue (PRO3). There is a 250-400lbs weight difference depending on the Spec Miata. Why do you think each car may be taking different lines?
T4 is somewhat of a false apex – you don’t absolutely have to hit the curbing but the benefits of staying closer to the curbing is that you travel less distance and you have more room to catch the car, if and when the car is upset by the bumps. When you brake depends on your car but generally speaking, with the chicane, you can go pretty deep into the braking zone and brake pretty lightly relative to braking for T1.
Think about: As in segment 1, when are you coming off the brakes as you enter T4?
As you dive into the T4, the rear of the car may start sliding, which is a good thing! Use maintenance throttle to settle it down and slowly start going to full throttle or modulating accordingly. How much throttle you can give it will depend on the speed you carried through mid-corner and how well the rear-left suspension components are absorbing the bumps. There is a lot of load on that rear-left, all the way through the exit of T5. Is your suspension bottoming out?
As you approach T5, you’ll have to either breathe off the throttle to get the car to rotate or give it some very slight braking. Get turned in and hit that curbing for T5. Then give it as much throttle as it will take and let the car release to the driver’s left as you approach T6.
T6 has different schools of thought. One school says sacrifice the corner and run the shortest distance possible. The other says that you should hit the corner with a wide entry and get an amazing run towards T7, where you don’t flare out as much on the exit of T6. I’ve seen data from both approaches and it’s really a toss-up. Find what works best for you and your car.
Just remember that the outside of T6 is off-camber and usually has a ton of marbles. You don’t want to be caught on the outside of T6 almost ever (save for rain) it will be slow and you will get passed.
Going fast through segment 2 should feel like you are on the ragged edge, having to catch the car slightly throughout the entire complex. This is no time to rest – attack!
Segment 3: The banana straight!
In my opinion, this is the second most important segment of the track. T7 leads onto the longest “straight” on the lap, so getting onto full throttle, without backing out is the most important thing here.
Where you determine your braking point will heavily depend on your car but the goal should always be to be at or near full throttle right at the apex of T7.
Can you see the ever so slight differences between the PRO3 (blue) and the Spec Miata (yellow)?
Think about: Where are your eyes when you are on the brakes for T7? Get them on the apex as soon as you possibly can.
Use one fluid motion to get the steering input for the corner and when you are pointed at the apex, commit and get to full throttle as quickly as you can. In all of my fastest laps, I have a healthy two tires on the T7 curbing and will have a slight slide on the exit, of which a quick steering correction will get it to stop and doesn’t require a lift. Over slide on the exit or have to lift after apex and you are dead in the water.
Segment 4: Brown trousers
In my opinion, this is the most important complex of the lap. It is the scariest and thus, even among good drivers, there is more variance in segment times than in any other segment.
The entry into T10 is the most important and it is much less about how late you can brake and more about how well balanced the car can be, as you carry a higher amount of speed through the corners.
Think about this: Will a car that is stood up on its nose because the driver braked super late, turn better than a car that is balanced front to back because the driver braked maybe a little earlier and lighter?
Some drivers can pull off (in a PRO3 car) braking at the 200 marker and keep the car balanced and others brake at the 300 and it works just as fine. Figure out what works for you and your car.
Make it your job to always, and I mean always put tires on the drivers-left curbing of T10. Then make as a straight of a line as you can to brake in a straight-line for T12. This means that you might miss the curbing on T11. That’s ok!
Brake in a straight line for T12, focus on when you’re going to release braking for T12 and get just like T7, get your eyes to the apex of T12 as quickly as you can. Turn in with a single, smooth movement and just nibble or have a full tire on the curbing of T12. This is slightly less important but if you do this, you’ll know for sure that you’ll have enough track on the exit and avoid hitting the tire walls for the drag strip (of which I’ve hit) or along the main wall.
As Ross suggested during the podcast, the goal is to get to full-throttle as quickly as possible. If you find yourself near the apex of T12 and at 50-75% full-throttle, just give it the beans! Go all the way and know that it might slide a little on the exit but you usually don’t need to lift to stop the sliding – a quick steering wheel correction will be plenty.
After that, it’s smooth sailing to start/finish. Release the car and have the lightest hands on the steering wheel as possible. Any steering input while at full-throttle is friction and friction means going slower.
Other things to consider
People say that Portland doesn’t use up brakes and tires and that’s sort of true but when you’re pushing, everything makes a difference. Using the curbs is really important but also has led to pad knock-back for several drivers, which isn’t fun.
Track temperature makes a huge difference on available grip and can swing 20-40 degrees from the morning to the late afternoon. That could make a difference of up to a second on lap times or more.
Track records are made on <100F surface temps, <80F air temperature, fresh tires, qualifying weight, a draft and putting it all together on the first 2-3 laps of a session.
That’s it! Let us know what you think about the guide and feel free to comment and share any of your tips and tricks for PIR. Do you do different things? If so, share it and tell us why.
I’ve been to Imola before. 2 years ago, we were in Italy for a hackathon week with my teammates on Track Attack, who are based out of the Friuli region, in the northeast area of Italy. My wife, 1-year old son and I spent a week in a tiny medieval town centrally located to Pisa and Firenze (Florence). One day, we took a day trip to Autodromo de Enzo I Dino Ferrari, also known as Imola.
Visiting Imola in 2015 during a Lamborghini private event and 100F+ temps.
Lamborghini was holding a private test event, but we were still allowed in, because technically, Imola is a city park. We walked the grounds, from the outside and inside the track. My favorite Top Gear episode of all time is the Imola episode, where the crew tries to match the lap time of the Stig’s Italian cousin. I drove Imola for the fist time in the Formula 1 car simulator at the Imola museum. I drove the track for 30+ hours in a Mercedes AMG GT3 on iRacing, to prepare. We did a track walk on Wednesday evening before the Thursday free practice.
This slideshow requires JavaScript.
It still scared the shit out of me.
Thursday, May 24th, 2018: Optional free practice
We signed up for the optional free practice. 2 sessions. 90-minutes each. 4 drivers. We decided to give each driver 20 minutes at each session. Seth would go out first and get a sense for the car and lay down some reference data for us to chase. And he did just that; a 2:06.XXX and not a single clean lap.
When I played football in high school, I was always scared, and I didn’t suck. Especially in the games. One of the coaches could sense it in me and other players, so he said once “half the battle is showing up. Just show up to compete and your training will take over.”
That is why I raised my hand and asked to go second. It was surreal, overwhelming and humbling. I’ve read articles from other first time and regular pro drivers, who have said that in these pro series, the time on track for getting up to speed is limited and regularly interrupted by incidents. To be honest, I shrugged those stories off and thought, “could it really be much worse than a competitive club racing weekend?” Yes. That is exactly how it is.
Not a single driver had a clean 20 minutes. None of us had a single lap where we weren’t being overtaken by at least a few cars.
This was our new reality and pretty much everything we articulated to explain our pace was an excuse. Dan Rogers, came up to speed the fastest outside of Seth, having a ton more experience (a 2:10.XXX best lap), then me (2:12.XX) and then Rob (2:16.XXX).
We reviewed data to look for places and ways to get up to speed but it was obvious. We were driving tentatively, over-slowing on pretty much every corner in general and especially when being overtaken, which was almost every corner.
A common site throughout the weekend. Drive, debrief, data and repeat. Photo credit: Petr Frýba
All my racing has been multi-class racing, with rarely being in the fastest car on track but this is a whole other level. The closing speeds and acceleration of pretty much every other car was insane, especially the GT3 cars. The message from Seth was clear, though he tried to be gentle with us – time to drop excuses and drive. Yes, the other cars are faster, but we have to figure it out and at least mid-corner speed, we could hang with almost all the cars; Seth had already proved it. I was driving almost dangerously slow.
When it was time for the second session, it was the same, I got three (3) complete laps over a ~25 minute period. But I was determined to drive confidently and hard. A couple of 2:10.XXX on the last two laps and on the third lap, where I came into the pits due to another Code 60, I had a 2:09.XXX going, backed up by a rolling best lap of 2:09.269.
Dan would get down to a 2:08.XXX and Rob got down to a 2:10.XXX – we were all progressing! Seth would not drive the second session, to give us more seat time but he would qualify the next morning and start the race.
By the end of the day, we had no real idea how we stacked up against the competition. We only knew that we were improving at a good pace and that the 131 car had a stacked lineup of drivers, with one of them being the reigning European BMW Cup champion. He had been driving a specific M235i Racing car for close to two years and he was/is good.
Code 60: Your new best friend or mortal enemy
Instead of full course yellows, Creventic has “Code 60’s”. Purple flags come out, with a big circled 60 in the center. When the Code 60 comes out, all cars a required to slow down, in a smooth deceleration to no more than 60 Kmph. It’s intended to get cars down to a safe speed so whatever caused the incident can be cleaned up and maintain the gaps between the cars.
See it. Remember it. Respect it. You’ll see it a lot.
In the race, if a Purple 60 comes out and you are near the pits, it gives you an opportunity to swap drivers, change tires and/or fuel up while losing the least amount of track position. The other side of the blade though is that if you are past the pit exit, it will take up to 4 minutes to make it back to the pit entrance and in that timeframe, the issue might be cleaned up.
Cars do not bunch up for the restart, it’s a simple call for green flags when the Code 60 goes away. There are random radar guns around the track to check for speeding and they also look at your lap time for a complete lap of a code 60. If it is faster than a 4:55, you are penalized. We ended up serving a 12 second penalty one time during the race.
Friday, May 25th, 2018: Practice, qualifying and race part 1 (4 hours)
The next morning, we all went out and made improvements. I got down to a 2:08.643 in my only complete lap and then a code 60, with a 2:07.XXX on the board. Rob got down to a 2:09.XXX and Dan to a 2:06.XXX.
Next Seth went out to qualify and though we had strict orders to stay off the yellow curbing on all corners, so we could make sure the car survived the 12 hours, the restraints were off for Seth and he went hog wild! He got down to a 2:02.719, putting is in P2 for the race.
The race started off crazy but mostly clean! Seth was able to get a good start and stay in P2. He was in the car for just over 1 hour and 40 minutes and then a Code 60 came out and it was my turn. Being the driver on-deck, there were several false starts, where it was almost time to go but then not.
I got in the car, refueled and then got going. Generally, I was able to get up to my speed quickly, steadily improving lap times and topping out at consistent 2:07.xxx’s regardless of traffic. When I was at the fuel station, I was told on the radio to have my windows up, but that requirement was only during re-fueling, at the refueling station (we couldn’t refuel at our pit spot). I interpreted the message as “have them up at all times”, which meant I wasn’t feeding fresh air to the air-conditioned helmet blower. Somewhere after the 1 hour and 15-minute mark, the heat really started to get to me; everything was hot. Like a heat I’ve only experienced once before when my cool suit didn’t work in a PRO3 car and 100F weather. I figured I’d get the call at any minute to pit but no call and no Code 60. What would end up being about 90 minutes into the stint, I started shaking and getting cold shivers. I radioed in that I probably only had 10 or so more laps in me.
To be honest, I had no idea what was radioed back but it was not “ok, pit next lap”. I kept driving, trying to remain focused, keep a semblance of a pace and not crash. Finally, the call came in to pit. I thought it was because they realized that I was in bad shape, but it was because I was minutes away from going over the 2-hour at a time driving limit.
Driver change! Photo credit: Petr Frýba
I come in to the pits, stumble out of the car, Rob goes in and I start looking for any source of hydration. About five minutes after being out of the car, I do a heart rate check on my Apple Watch and… 136BPM. Holy crap. And I am still on fire and can’t seem to drink enough water or the special Italian “Gatorade”. A few minutes later, back in the trailer changing, I get the news that Rob is in the beach after an incident with a GT3 car. With only ~4 minutes left in the first 4 hours, the workers do not pull us out of the beach and we can’t get it back to the pits for inspection and repairs. The first 4 hours come to an end we are down 3 laps from the lead.
The end of our day 1 with less than 5 minutes to go.
An hour or so later, we were able to look at the car, from afar while it sat in parc ferme (impound).
Our chariot in Parc Ferme – dirty and slightly broken
Luckily, the car is in the corner and the Sorg crew checks it out and determines we have some bent and broken suspension components. This eliminates the option to have Dan start the race with the car as is, shake off the rocks and get a sense for how the car runs.
We decided to take a 10-lap penalty, so we could make repairs before the race restarts Saturday morning. That night we had an excellent spaghetti dinner at the Villa we stayed at (was built in 1420 and owned at one point by Napoleon Bonaparte’s grandmother) and finalized the plan.
Dinner at Napoleon Bonaparte’s grandmother’s villa. Built in 1420 and furniture from the 1700’s…
We were P1 for a good chunk of part 1 of the race because of good luck with Code 60’s but our fastest pace was still slower than our main competition (#131). With the 10-lap penalty, all we could really do is put our heads down, put down clean laps, stay out of trouble and hope the endurance gods would punish the competition.
Saturday, May 26th, 2018: Race part 2 (8 hours)
Dan would start the race, put down solid laps, stay out of trouble and then hand over the car to Seth. Seth would go in and do the same, getting back as many laps as possible – hoping that Seth could match lap times with their fastest driver and we would be faster than the rest of their drivers.
Over the general race pace, that would end up being the case – we steadily clawed back laps from the 2nd place car but slowly we’d lose ground to the first place #131.
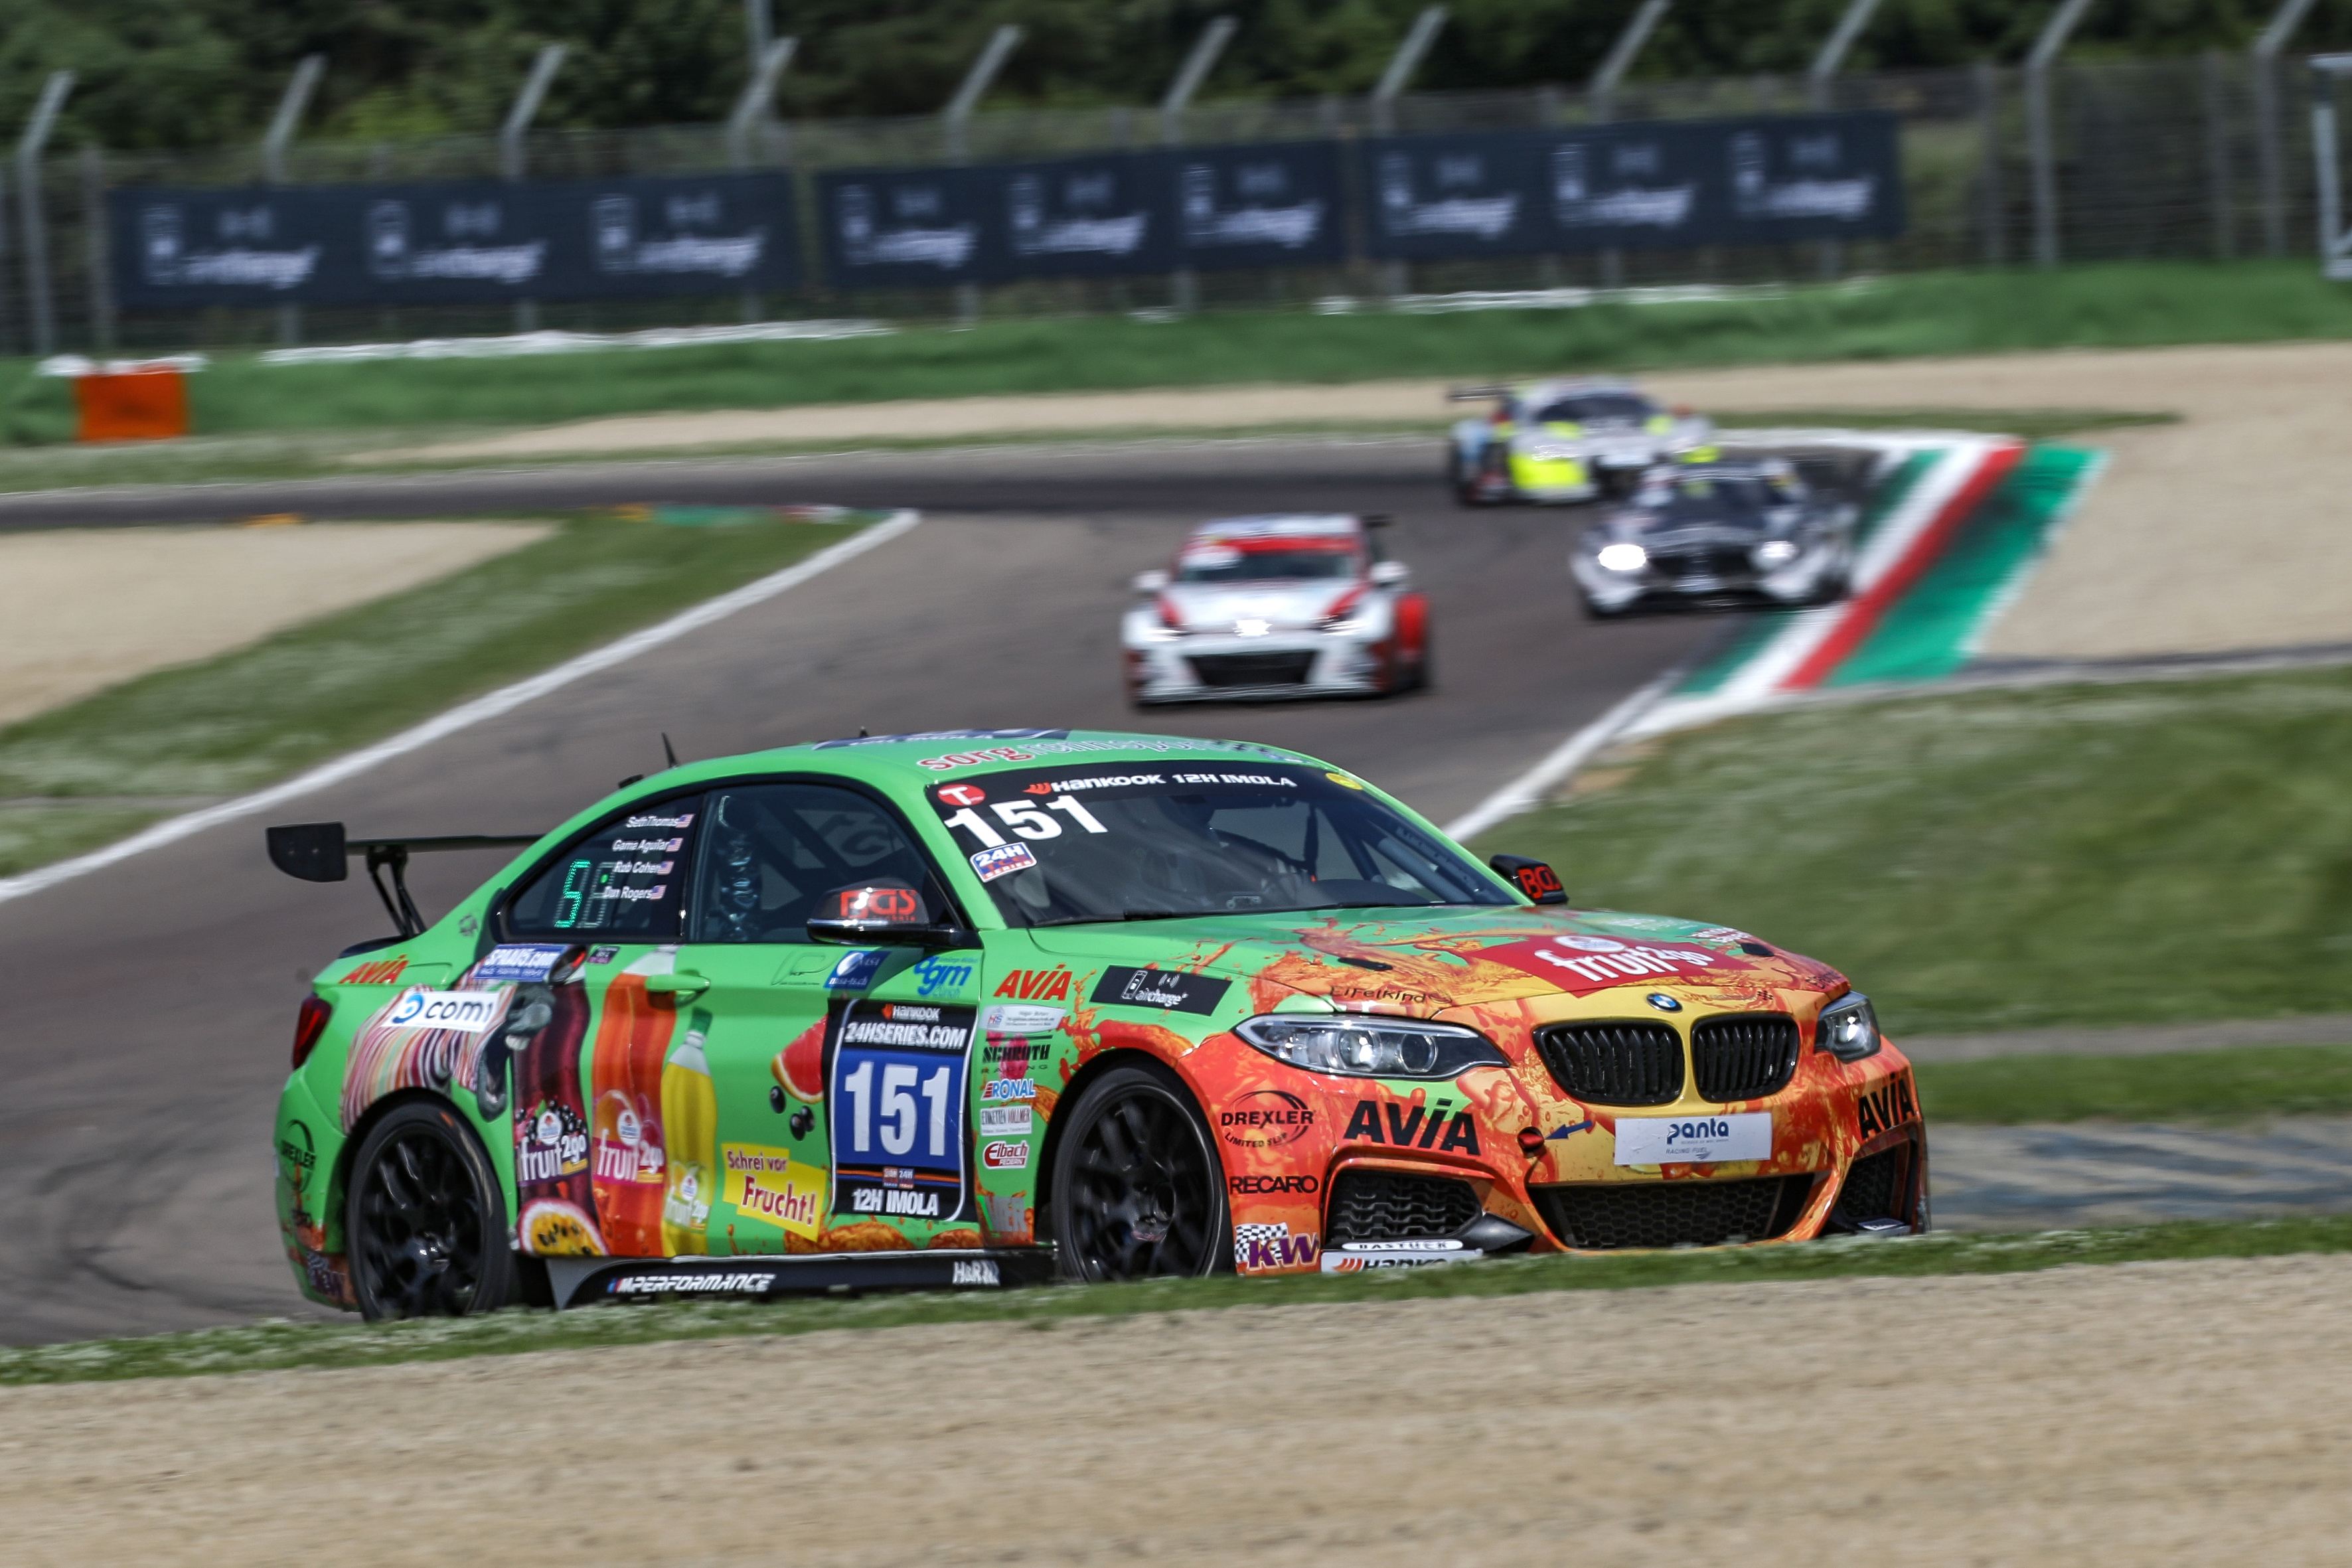
Dan Rogers (@epsdan) riding the curbs to get us some laps back. Photo credit: Petr Frýba
In the third stint, I went back in for what would end up being about 1 hour and 45-50 minutes, safely clear of the 2-hour driving limit. I was able to get up to speed even faster than Friday and in the second half of the stint, when the heat soak returned, and I realized the Camelback with a mix of water and Italian Gatorade was not connected to my helmet, something clicked. Something that Seth had been preaching to us for the past 24 hours (and will be reserved for another time). I trusted his advice and just did it, and the car didn’t go off into the dirt or in a wall – it held. The times started steadily falling, the 2:06’s started coming effortlessly, almost regardless of where traffic was interfering. And then, a 2:05.xxx! And then another 2:05 in the predictive lap timer but spoiled by traffic and another, spoiled by… me (I was getting greedy).
Traffic or not, need to make up time! Photo credit: Petr Frýba
I was ecstatic but drained and as I’ll write about in another post, I didn’t have the stamina to sustain 2:05’s. I had already started driving with the windows cracked and on the straight-aways, I’d put my hand out of the window to funnel outside air in and help cool me down. The time went by much faster this stint and before I knew it, the call was in to pit. There was a Code 60 for a badly damaged car which would take 10-15 minutes to clear up, so though the Code 60 came out right after I had passed the pit entrance, I was able to circle back around and pit, under the Code 60 and Dan was able to get back in the car and on track before the green flag flew.
Dan had a great second stint, consistently hitting 2:07’s and staying out of trouble. We had clawed back more laps and with Seth going in for the closing stint, it would be close. Enough green flag running or advantageous Code 60’s is what we needed. Seth came out with a full head of steam and immediately started putting down 2:03’s and 2:04’s – getting back 8-12 seconds per lap to P2. With an hour left in the race, the cars started falling like flies. One car after another, breaking down on track or barely limping back to the pits for a repair but no Code 60. Finally, with about 15 minutes left in the race, one of the leading GT3 cars, a beautiful matte-red Mercedes AMG GT pulled to the side of the track with a collapsed front wheel. Even though it pulled off in a decently safe area, the Code 60 came out, leaving only a few minutes to finish the race and with that, our chances of P2 washed away.
One of the overall race contenders, broken down with less than 15 minutes to go in the race.
After 8 hours, we had clawed back a full 10 laps and were only 20 seconds away from P2. Another few laps of green flag running… but that’s racing!
Seth Thomas (@racerseththomas) bringing it home in P3 Photo credit: Petr Frýba
Podium finish to top off a great weekend
Despite not being able to claw back P2, we still made it on the podium and it was also my first experience actually standing on a podium, let alone the same podium and podium room that mega stars of racing have been in and stood on. Overall it was a great experience and looking forward to the next race, which we’re targeting the 24 hour race at Circuit of the Americas in November or possibly Barcelona in September.
Before we get into the actual on-track action and the race, let’s talk about the car we drove for the 12 hours of Imola.
BMW M235i Racing by Sorg Rennsport
The story goes that a prominent leader in BMW Motorsport was at the 24 Hours of The Nürburgring several years ago and noticed that in the sub-GT4 categories, there were several BMW’s competing but they were old (E30’s and E36’s) and took a ton of work to get them race ready and maintained, let alone competitive.
With Mazda having a full factory developed and globally homogulated Global MX-5 Cup Car, BMW decided to build their own solution. Since its launch in 2014, the BMW M235i Racing has seen steady uptake in the marketplace, with BMW Cup Racing series all over Europe, in endurance races like the Creventic 24 Hour Series, VLN and in professional touring classes all over the world, like the TC classes in Pirelli World Challenge. As an entry-level professional race car, its hard to beat the value despite the sticker price and driving experience, as we’ll cover below.
The VLN BMW M235i Racing Cup Series Photo Credit: VLN
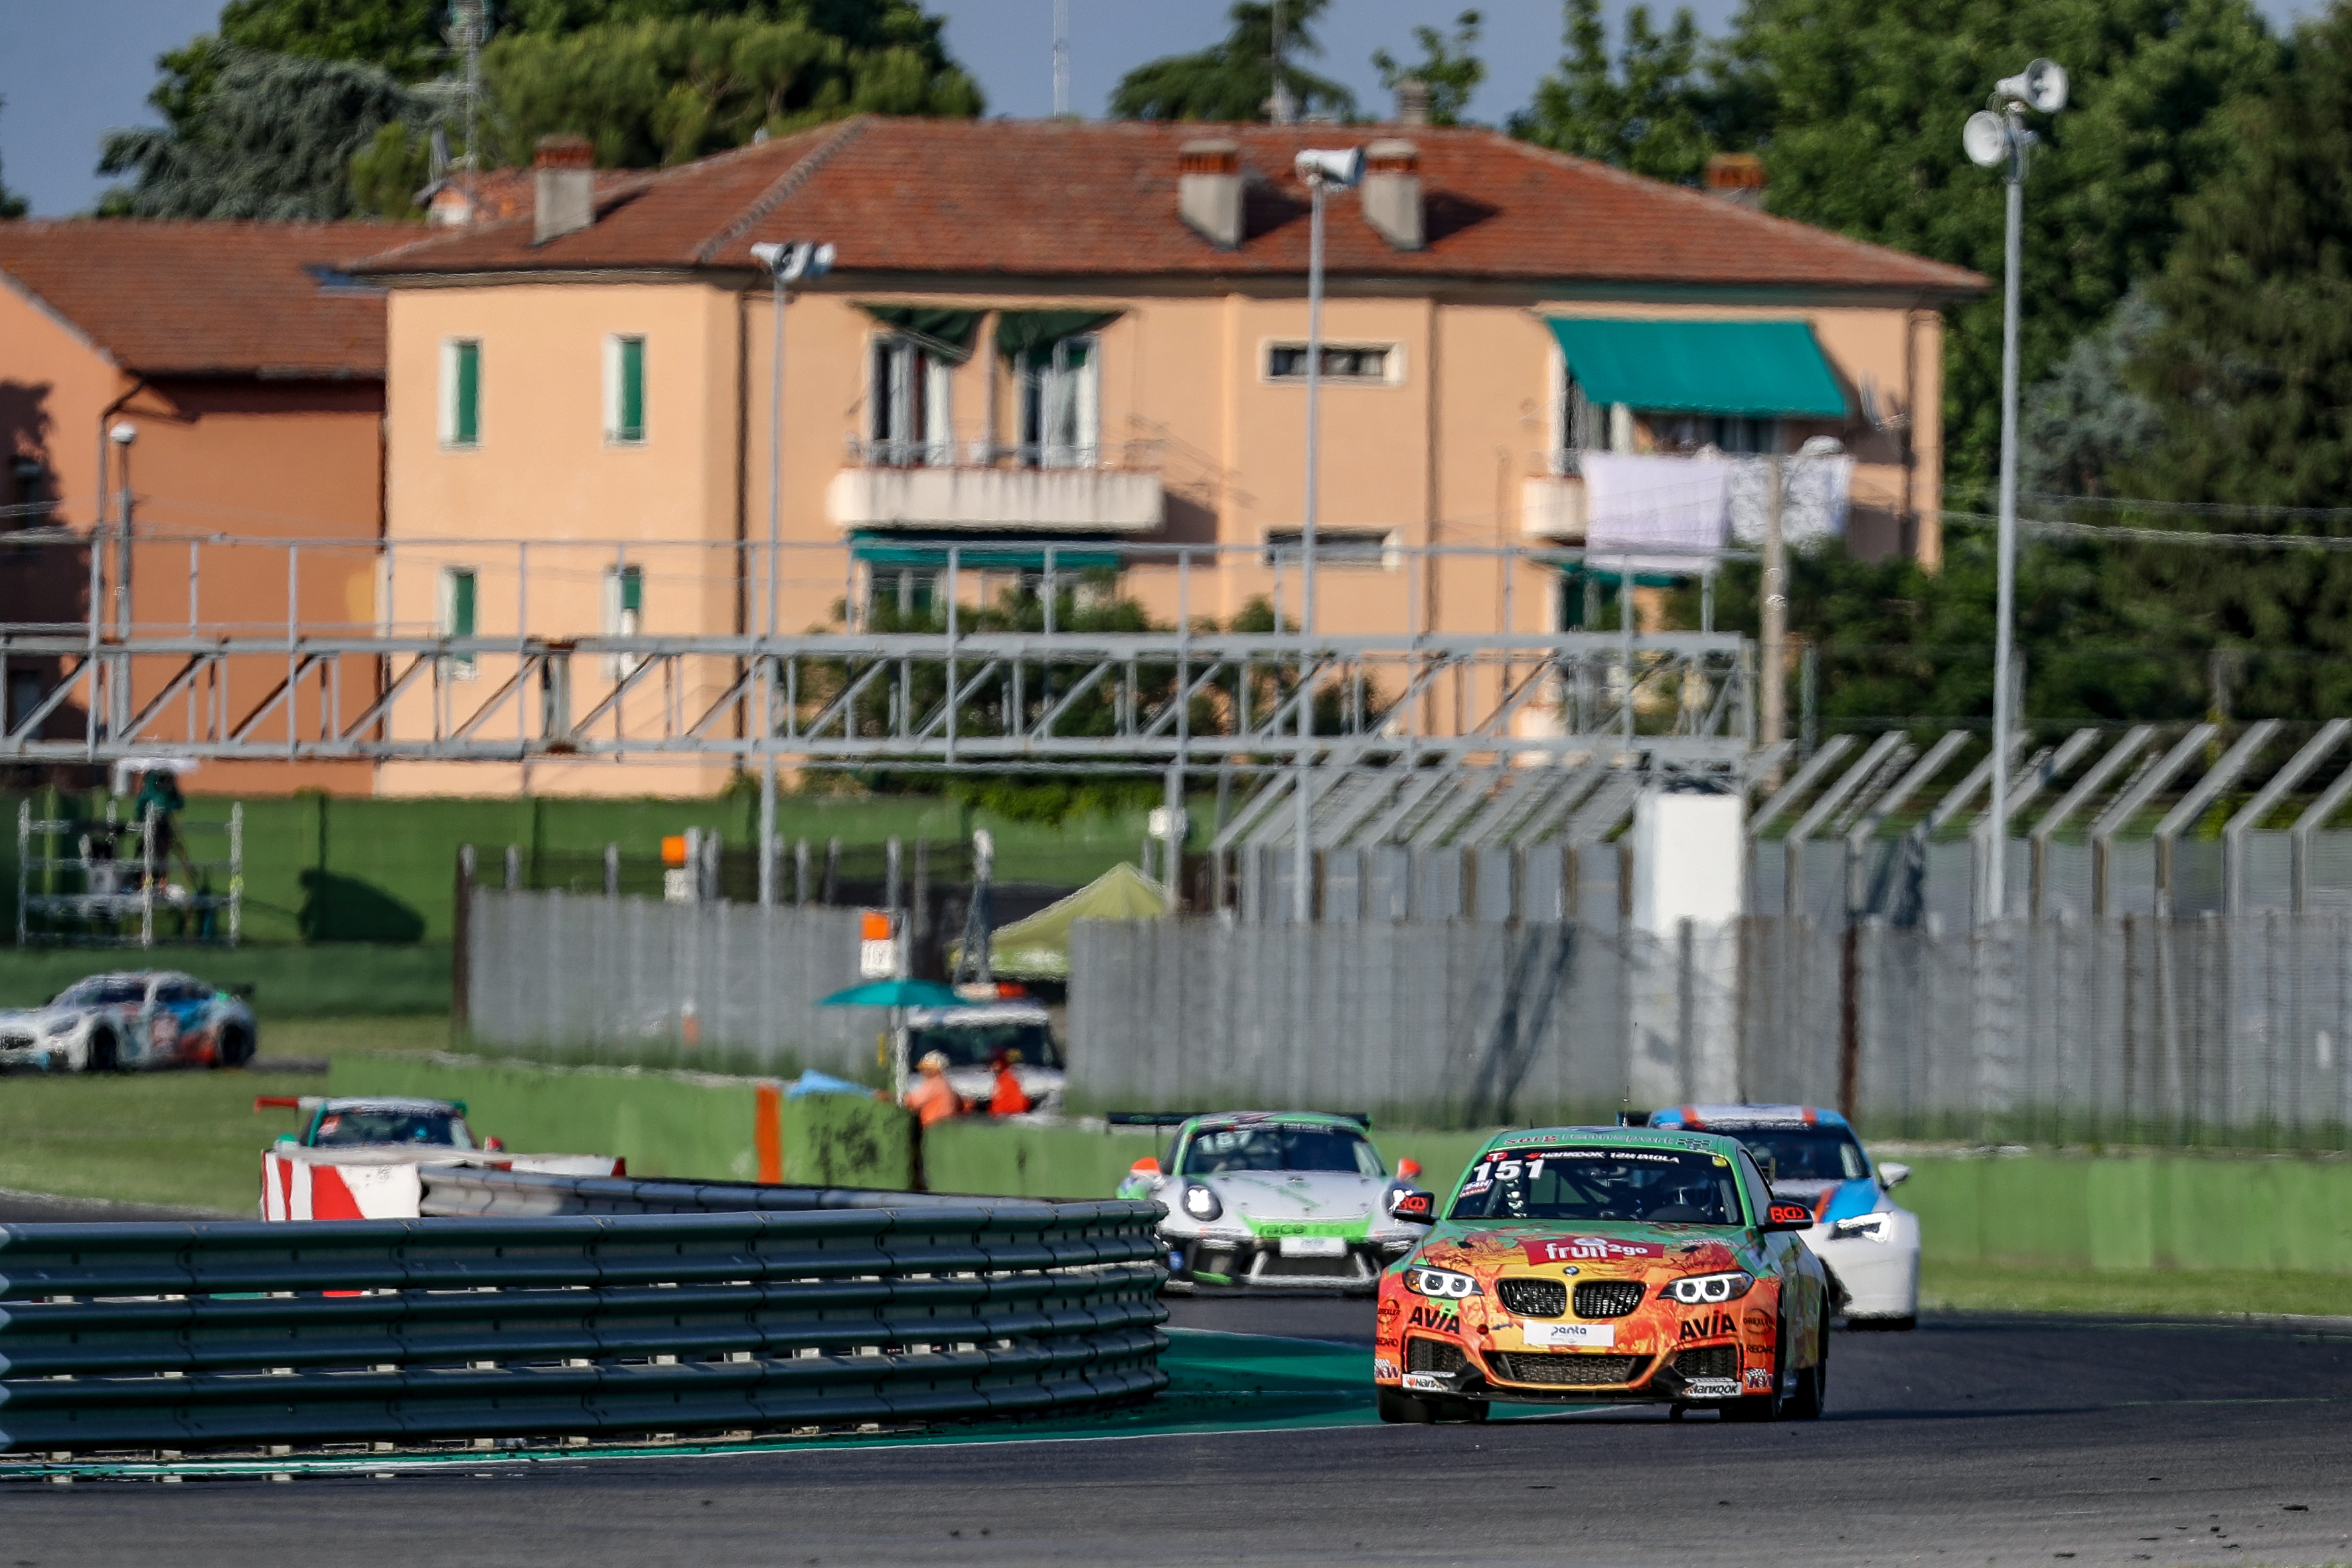
We were originally supposed to drive this car below but in the prior 24 Hour of Nurburgring race, it was wrecked a couple times and was down for repairs. So Sorg prepared and brought out the “Orange Juice car” as my son named.
The car we were originally going to drive but was damaged at the Green Hell. Photo credit: Petr Frýba
The “Orange Juice Car” Photo credit: Petr Frýba
The basics
DIMENSIONS
Length: 4,454mm
Max. width: 1,862mm (without mirrors)
Height: 1,380mm
Wheel base: 2,690mm
Max. track width: 1,608mm
ENGINE / TRANSMISSION
Straight six-cylinder petrol engine
BMW M Performance TwinPower Turbo
Capacity: 2,979ccm
Output: 245kW (333bhp)
Torque: 450Nm
Racing exhaust with racing catalytic converters
Steering wheel with shift paddles and lights on the steering wheel (awesome!!)
BMW M Performance limited-slip differential
TANK Motorsport safety tank
SUSPENSION / STEERING
KW dampers
H&R suspension springs
Front: H&R anti-roll bar (2-way)
Rear: H&R anti-roll bar
BRAKES
Front: High-performance motorsport braking system –
Performance Friction (PFC); 4-pot fixed calliper
Rear: BMW M Performance 2-pot braking system
ABS / DSC / ASC
BMW Motorsport specific racing application
TYRES / WHEELS
18×10 inch alloy rims
265/60/18 tires – we ran Hankook full racing slicks though we’ve seen this car run on Pirelli’s, Dunlops and Michelin’s across the globe
SAFETY COMPONENTS
Cage with DMSB certificate and FIA approval
6-point racing harness from Schroth
Racing seat RECARO Pro Racer SPG (we had an OMP HTC-R carbon seat)
Exterior
The car is built a ‘body in white’ to make it super easy for a great wrap job. It is the 235i body with the body panels from the M2, which presumably provide a variety of aero benefits. Sorg has it outfitted with the optional rear wing, which is adjustable to aid in rear down-force.
Seth Thomas getting acquainted with the car. You can see the body in white and the full body wrap.
Bottom line, it looks awesome in just about every livery I’ve seen. A bit boxy compared to most sports car but expected for a BMW. The aero bits make it look aggressive and with the incredibly meaty 265-wide slicks, it looks beefy from every angle. You’ll notice that in most pictures, we ran with the windows up. It comes with the power windows still and fully functional. It wasn’t until the cockpit got really hot, that we’d crack a window to circulate air and feed cooler air into the helmet blower.
This slideshow requires JavaScript.
Interior
This car is the standard for every production-based race car, even a club race car. Period. The interior was clean and tidy with the factory dash just about fully intact. The steering wheel had shift lights, programmed to keep us within the meaty part of the power band and the small LCD screen that read out the amount of fuel we’ve used since the last refill/reset, lap times, water and oil temperatures.
Straight factory look and yes, my eye line is only a couple inches higher than this…
The shifters were in perfect position to shift up and down without readjusting your hands. The OMP HTC-R carbon fiber seat was on sliders, to accommodate several driver heights, of which for us ranged from 5’6″ for me to just over 6′ for Seth Thomas. I normally don’t love sliders but these were solid and provided all of the range we needed.
Much of the interior is trimmed with carbon fiber goodness, which looks great and keeps everything looking clean and professional.
The car still comes with a racing oriented but still operating Driving Stability Control (DSC) of which we turned completely off. I personally didn’t drive with it on on, so I can’t speak directly to the differences but having it fully off was great and I felt like I could easily manage the amount of corner-exit sliding with throttle and steering input.
Sorg outfitted the car with Motorola digital radio system, which was a bit random in its performance throughout the weekend. Imola is a big track, with lots of elevation changes so we rarely had good audio quality at the farthest points from the paddock and saved most critical comms for the front-straight away.
In the center console, you can see the Motorola radio and that on/off switch is for the helmet blower.
This was also the fastest and loudest (though not super loud) car I’ve ever raced, along with racing amongst the fastest and loudest cars I’ve ever raced with (up to GT3 cars). I found that my super awesome Stilo helmet with the ear muffs were simply not enough, so I had an on-track vendor install the additional component so I can have molded ear plugs, in addition to the built-in noise cancelling ear muffs and that seemed to help quite a bit.
Sorg installed an air-conditioned helmet blower, versus the standard air blower I have in my PRO3 car. This thing worked great for the most part. It needs an air intake, then it cools the air before forcing it through the air tube. The issue I ran into was that in my first race stint of nearly 2 hours, I ran the whole time with the windows up. And even though we had the car’s fan circulating air into the cabin, everything got heat soaked and with 40 or so minutes left in my stint, I was heat soaked and the blower was pushing around hot air (which was still better than nothing).
One driver mentioned that the dash was a little tall and he didn’t love not being able to see the hood and thus not having as strong of a sense of where the car body limits were. This is true but for me, I’m used to sitting low and being short, so I never see the hood, so that didn’t bother me.
The cable management, cage design and installation is pristine, though it was interesting to see that the cage is actually a bolt-in cage, versus a welded in cage at the mounting points. I’m sure there is science and logic behind this but that took me by surprise.
Lastly, the car had a full AiM data logging system built in and capturing ECU channels. As usual, we lived and died by the predictive lap timing feature and during practices, we used the Apex Pro Driving Coach tool, where Seth set some baseline laps and then we focused on making the lights as green as possible in the corners.
How did it drive?
Before driving the car, Dan and Seth said that the M235i Racing would drive like a big PRO3 or Spec E46 car, of which are my only two reference points. And after the experience, they were mostly right.
With power steering, ABS and a paddle-shifting automatic transmission, it was the easiest car to race I’ve ever driven. What you do is still the same in terms of driving but it’s just easier. All inputs don’t require much of any force and the seat, seating position and Schroth belts are simply comfortable. For example, I have an Apple Watch and when I drive my PRO3 car (no ABS, power steering and a CAE shifter) I don’t need to ‘start a workout’ on my watch. The amount of work I am doing and vibrations automatically make the watch think I am working out and it logs a workout.
In the BMW M235i Racing? Not so much. After both my racing stints, of which both were nearly 2 hours, I was toast. Overheated, dehydrated, mentally and physically exhausted I looked at my watch and no workout detected. I had to manually have it check my heart rate about 5 minutes after getting out of the car and it was still at 134bpm.
Getting 3-wheel action is easy- peasy in this car! Photo credit: Petr Frýba
So yes, it was the hardest, most exhausting driving I’ve ever done but I might as well had been sitting in a beach chair.
This thing is fast.
With ~330whp and on full racing slicks, this car is easily the fastest car I’ve ever driven in a race. My perspective is a bit skewed because while we were hauling @$$, we were driving in the slowest class of the race. It literally felt like I was driving with an anchor dragging behind because of how stupid fast the TCR, GT4, GT3 and Porsche Cup cars were.
Still, this car is fast and when not over-driven, it is really easy to go fast. The key difference for me was to trust the higher than normal mid-corner speed the car could carry due to it’s more advanced suspension and big/meaty slicks. Seth and Dan mentioned that the Hankook’s were not the fastest slick available but are likely a great value because they tend to last at 90% of the peak grip for a good amount of time.
Bottom line is that this car could hang mid-corner with every car on-track except for the GT3 race cars and possibly the TCR cars. I could definitely feel the additional size and weight of the car transitioning weight from side to side, compared to a 2700 lbs PRO3 car but after a few laps, it felt normal.
Not a mistake – this car can hang with most any car mid-corner! Photo credit: Petr Frýba
Power-wise, it has gobs of torque but not an incredible top-end. Corner exit I could stay on the rears of several TCR cars but then they would slowly pull away, while just about every other car would leave us like if we were parked.
Braking was great and confidence inspiring. Braking for Turn 2 (the first chicane) and Turn 17 are full, 10 out of 10 braking zones. After building up my confidence, I found myself braking at around the 175 meter mark for the 1st chicane and the just before the 50 meter for the last chicane. HOLY CRAP! But the car would slow down, turn in and handle it, with no complaints.
Being a turbo car, there was a tiny bit of lag from throttle application to feeling the grunt. So it was even more critical to get to full throttle as soon as possible. For the most part, the LSD and the Hankook’s would take the full throttle corner after corner and lap after lap. I only got a bit more sideways than I’d want on corner exit a couple of times: once in turn 7 when I was testing the limits carrying speed through the corner and up the hill – simply too early on full throttle with too much steering input and a second time on the exit of the last chicane, when I got a bit more exit curb than the car could hold while try to get full throttle. I didn’t back out, just a simple steering correction as I still had a few inches before getting to the big turtle bumps that were there to eat up suspensions.
Final verdict: It could be the perfect race car for you and me at some point
At around $85k USD brand new, the BMW M235i Racing is seriously a great deal. For reference, to have someone build a top quality Spec E46 race car, it can cost upwards of $60k. $25k gets you a pretty much guaranteed quality and consistency, factory supported race car.
I’ve looked around and still not quite sure what they are going for used but I wouldn’t be surprised to see them available for $40-50k USD.
The driving experience is incredible and consumables are on the low end for a pro-level race car.
The issue for me is that I care most about competition. I want to race in big fields, with closer to spec cars and see how I stack up to the best competition around. And outside of Pirelli World Challenge, there isn’t a ton of these yet in the US and especially in the club racing ranks. If that were a different situation, I would seriously consider finding and racing a BMW M235i Racing.
I’ve heard and read that the BMW M235i Racing Cup is popular, with country and Europe-wide championships that are fielding 20+ cars at a time. If I lived in Europe, this would also be a strong option.
Until any of those things happen, I’ll have to settle for making my in-process, BMW Spec E-46 look and drive as close to this beauty as possible and racing with Sorg Rennsport 1-3 times a year. I can’t wait for the next time!
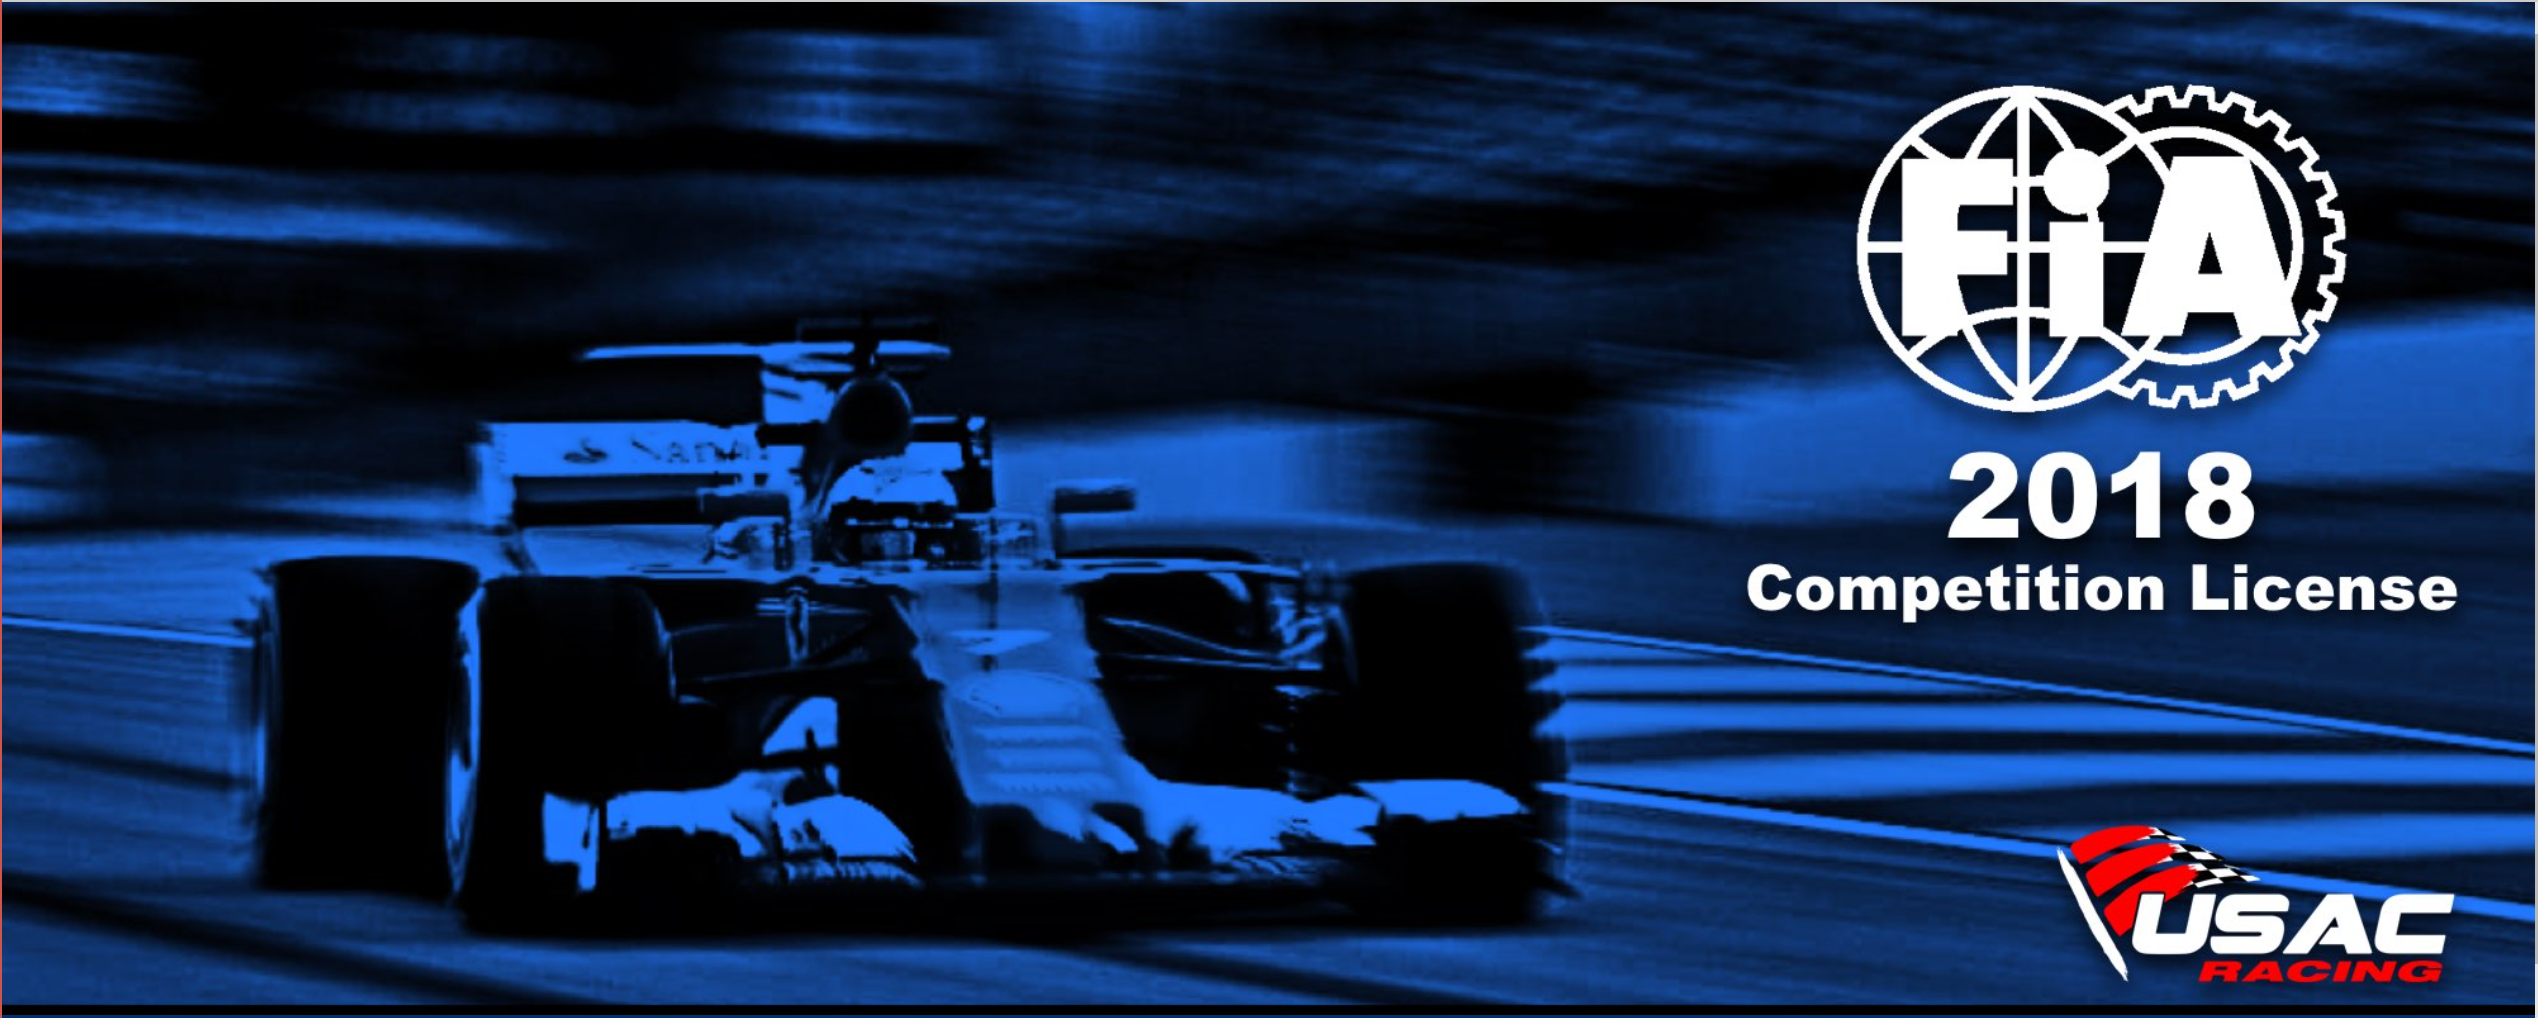
So you want to go ‘Pro’ racing? Or maybe you want to have the license that gives you access to every regional sanctioning body in the US? Odds are, you’re going to need more than the regular regional racing license. And if it is international competition, you’ll very likely need an FIA (Fédération Internationale de l’Automobile) racing license. For the Creventic 12 hours of Imola race, that’s exactly what was needed, so here is what that experience was like.
What’s different between an FIA and a national/regional (e.g. SCCA/NASA/ICSCC) type license?
One major thing: FIA licenses are for experienced racing drivers, not just accredited racing drivers. For just about all other racing licenses, you need to prove that you’ve completed a [insert level of quality here] racing curriculum. You need not have actually completed many races or been ‘fast’ to get an SCCA, NASA or for me personally, ICSCC racing license. This level of training shows that you have a base level understanding of race car dynamics, how event is organized, what the flags mean and how to be safe on-track.
From the application process for FIA, they have a higher bar. They are looking for some level and amount of experience. They want to know who you are as a racing driver, via the driver biography.
The second thing is the general global acceptance of the license. At least within the US, if you have an SCCA license, it will be accepted at various levels by other sanctioning bodies. SCCA being the most widely accepted, NASA following closely behind and more regional licenses also being accepted but having to provide more proof the further outside the region you go because there is a lower probability a licensing director has heard of the regional body.
Bottom line: When you have a valid, in good standing FIA license, you can pretty much race anywhere in the world.
How to get an FIA license: Step by step
Step 1: Collect these pieces of information before you start the application process
I used a head-shot from a photo shoot at work, cropped to be 2×2 inches or 51x51mm. Make sure it is saved in .jpeg format for best picture quality.
A racing biography. This was a little confusing as there is no standard template. So I simply created a ‘resume’ style biography of my driving. I’ve included a PDF copy of that below for reference. It needs to cover things like how long you’ve been racing, what organizations, how many races, finishes, etc.
A current copy of a medical exam form for racing, that was completed in the past 3 months. The FIA also does not provide a template, so I used the medical exam for used for an ICSCC competition license and that worked just fine.
Fill out the form. The first section is your personal details.
Select ‘No’ for Have you had a previous FIA competition license.
Select and upload your racing driver bio document. PDF format is your best bet.
The second section you should select ‘Competition License only’ and yes for the additional fee for International Competition Authorization.
Select Grade ‘C’ unless you are driving a GT3 race car or higher.
Upload your passport style photo and completed medical exam form.
Check the waivers and acknowledgements.
Click next
Step 3: Pay the fee
Yes, this is expensive and resulting in almost $500 USD. The positive side is that this should be the only license you need if you compete in US national and regional club racing competitions. You might still need to pay a guest fee of some sort but that’s it.
You will get a confirmation screen and document which outlines everything and even provides a handy QR code to track the progress of your application.
Summary: Simple and straight forward
I personally did not request the expedite service and in under 2 weeks, I got the license in the mail!
My license to kill… tires and lap times!
From the moment I first clicked on the link to apply for the license, to when I got the license in the mail was about 1.5 months. This was because I had to ask questions about what does a racing bio look like? What medical form should I use? Then I had to make and get to a doctor’s appointment, of which was a little hard because work-life and life-life has been a bit crazy.
But overall, if you’re looking to do FIA sanctioned competition its not a difficult process to get through, especially with this guide. 😉
Let us know how it goes for you? Did you have a different experience? Have you applied for a B or an A license? Share other driver bios!
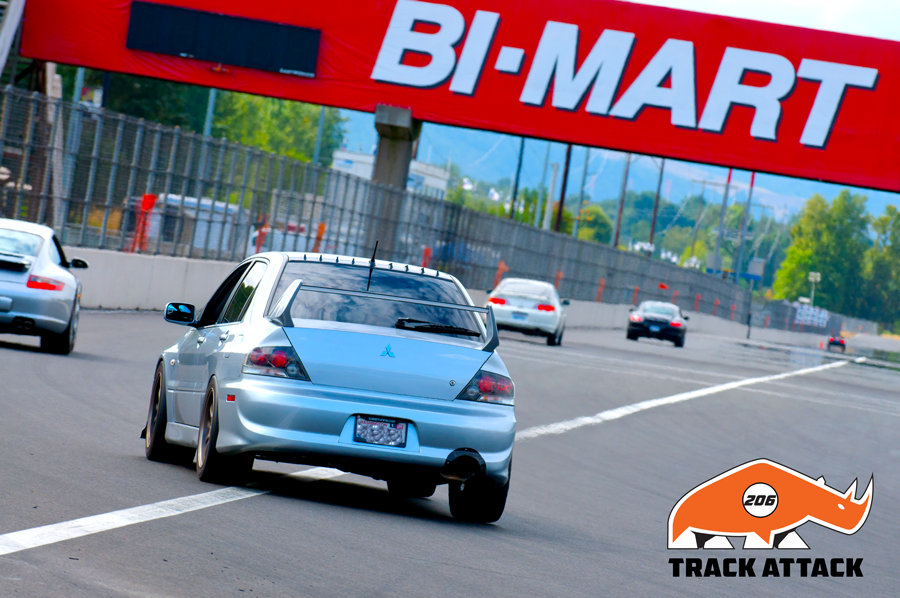
My first on-track experience was a 1-day High Performance Driving with Proformance Racing School at Pacific Raceways. It was a actually a birthday present for my wife. She had a Mitsubishi Lancer Evolution 9 and I had a 400whp 2008 Subaru Impreza WRX STI.
His and her’s AWD turbo beasts! I still miss that STI!
That day I learned that I had no clue what I was doing behind the wheel of a car from a ‘racing’ standpoint, especially one with that much power and in general the capabilities of the car. I also realized that learning to drive a car on-track with skill and being fast was going to take time, but I was up for the challenge.
Over the next 12 months, I did several track days and learned about the then, GRAND-AM Continental Tire Series where production-based race cars, like my Subaru, raced in the GS and ST classes. Further, here in the PNW, we had several drivers who had started out in local club racing and driven or were driving in series like that at the ‘professional’ level.
I have dreamt and continue to dream of owning and racing cars like this!
Since then, it’s been a goal of mine to at least once, drive in a professional racing series in a production-based sports car.
Getting the invitation
Over the past four years racing in primarily PRO3 class, I’ve met several former PRO3 drivers who have or still do drive professionally. One of which is Dan Rogers and through him, Seth Thomas, of which they have co-driven in multiple race cars and series over the years. In 2018, they decided to see about putting together a program to do at least a handful of the Creventic 24/12 Hour Endurance racing series, which has races in the most iconic circuits all over Europe and at Circuit of the Americas.
They reached out to several drivers who presumably have a minimum level of proven speed, ability to keep a car clean and ultimately, afford to take part in all or some of the races. When I first got the email, I almost brushed it off completely, assuming it would be way too expensive for me to afford but it turned out to be not too bad and in the grand scheme of this type of racing, a solid value. Coupling this with an extended family vacation and a couple of business meetings, taking part in the race went from a pipe dream to a bucket list reality.
12 Hours in a factory race car | BMW M235i Racing
The race will be a 12-hour race, split over two days. I’m not exactly sure why this is but having visited Imola a few years ago, I can imagine it being a noise ordinance issue as Imola is actually a city park, with residential buildings right on or next to the track property and park. I’ve also heard from organizing bodies that holding a race over-night is much more expensive than running during the day due to the required workers and lighting.
The BMW M235i Racing factory race car – raced in professional TC series all over the world.
The weapon of choice is a newest generation BMW M235i Racing 2-door coupe, built and sold directly by BMW motorsports as turn-key solution for the ‘entry levels’ of professional racing. I don’t know the exact class we’ll be racing in but the car is capable of pace just slightly slower than the new global TCR cars.
Sorg Rennsport’s BMW M235i Racing car in for a pit stop
It has a 3.0L, twin-turbo in-line 6-cylinder engine and a 6-speed automatic transmission, with paddle shifters. Dan Rogers, who has driven the car previously described it as essentially a bigger PRO3 or Spec E46 car, in terms of handling characteristics. This is music to my ears as it means, well balanced, plenty of brakes and enough power to have a great time but not so much that you could get into too much trouble. The car is owned and managed by the Sorg Rennsport Racing Team, out of Germany.
Learning the track
Having never driven Imola in-person, my main resort to learning the track was iRacing! My simulator is primarily setup for iRacing, so even though I realized a couple weeks ago that Imola and a close sibling to the M235i Racing was available on Assetto Corsa, I decided to do all my training on iRacing and using the Mercedes AMG GT3 race car. The AMG has a lot more power than what we’ll be driving but I figured it had similar characteristics from previous driving; rear-wheel drive, paddle shifters and more under-steering characteristics relative to something like a 911 GT3 or the Audio R8 GT3.
Over the past 4 months, I’ve logged over 1,000 laps and 30+ hours of seat time. I’ve also used Virtual Racing School’s data pack feature, to compare myself with one of their coaches with a reference lap time of 1:42.xxx. The data pack is from a different season where multiple updates to the car, tire model and track have been rolled out, so trying to replicate the lap time exactly isn’t possible but my goal was to get as close to it as I could. My personal best ended up being a 1:45.2xx but most importantly, the last few weeks I was able to jump in and start hammering away high 1:45’s and low 1:46’s, with relative ease and regardless of fuel load. In an endurance race, yes being fast is important but being consistent and keeping the car clean is even more important.
Autodromo Enzo e Dino Ferrari – IMOLA!
So how well do I know the track? We’ll find out for sure but by just closing my eyes, I can recite…
Turn 1, full throttle and get ready to straighten the wheel and brake past the 200 marker for the first chicane.
Turns 2/3, make sure to hit the backside of turn 2, so that I can square off Turn 3 and get a healthy full-throttle run at apex. Stay off the big bumps on the curbs.
Turn 4, slight left hander of which the goal is to stay flat but might need to lift depending on the angle of entry and how well the right rear tire is holding.
Turns 5/6, similar chicane but there is more distance between the two turns. Similarly, hit the back side of 5, square off turn 5 and get a healthy full throttle run at apex and use the exit curbing as needed. Do not touch the big bumps on the inside of the corner, they will destroy your time and your car.
Turn 7, very slow left-hander that feels like a decreasing radius corner. Important to get the car turned and then back on throttle quick and somewhat aggressively.
Turn 9, very fast left-hand turn with a stab of the brakes and then quickly back on throttle – let the car nibble at the exit curbs but don’t get too greedy. It’s hard to stay full throttle with being too much on the curbs as the rear end tends to kick out.
Turns 11, 12, 13 – an interconnected, high-speed and critical sequence of turns. A brush of brakes to do a full ‘send it’ into turn 11 and making sure to hit the apex curb. A stab of throttle before 6 out of 10 brakes, downshift to 3rd gear and bite off a decent size of the apex curb for turn 12 and then full throttle as quickly as possible to go up the hill and Turn 13 ends up being more of the exit curbing of Turn 12 than anything else.
It is very easy to let the car run over the big exit curbing here but iRacing will punish you for track limits so make sure to only get a max of 2 tires over the white line.
Turns 14 and 15 make up the last chicane of the lap, that feels a lot like Portland International Raceways. Take a big chunk of the T14 curb, flick the car to the left and get to full throttle at or before the apex of T15. It’s ok and even sometimes the curbing of T15 helps rotate the car, let the car release to the exit curbing but only go 2 wheels off.
Turn 16, a full throttle bend in the road – create a straight line that helps you get to driver’s left to setup for a very tough T17.
T17, a very intimidating and high speed right-hand corner, where you are flat and right at shifting to top gear. Position the car for a late apex and be ready for 10 out of 10 braking effort, in a straight line and shifting from 6th to 3rd
Turns 18 and 19, the last set of real corners before the front straight away and start/finish. Important to get the curbs on both corners and T19 is the most important to get to and stay full throttle as quickly as possible. Just a brush of brakes is needed and use all of the exit curbs.
Turns 20 and 21 are essentially bends in the road. Take them full throttle and have as little steering input as possible. Steering input = friction = slowing the car down. Make down the straight away as quickly and frictionless as possible.
Generally speaking, I think I have 80% or so of the track down in my head and developed muscle memory so that when I get into the car, I can focus on driving the car and figuring out how to go fast, versus figuring out my way through the track.
Physical training
This is an endurance race, in Italy at the start of the summer. I’ve been in Italy around this time of the year in the past and it can get hot, really hot. I’ve been working on my cardiovascular endurance – 60+ minute runs and cycling sessions.
I’ll be honest that while I’m in decent shape, I’m nowhere near where I wanted to be. Life has gotten incredibly busy on all fronts and I’ve been lucky to get in 3 workouts per week and a few simulator sessions. To top it all off, this past weekend, I did a PRO3 race weekend and only did one run group. The driving felt great but, I improved my personal best lap time during the actual race but by Sunday afternoon, my lower back, on my left side was sore. I’ve only experienced this last year, when I was a couple months post a surgery and next to no working out.
No expectations
Overall, I am sitting on this airplane with next to zero expectations. There will be four total drivers, one of which I know will be faster than me (Seth). Dan will either be around the same pace or faster because he has a ton more experience in professional races and Rob, the third driver – I don’t know at all.
I will work at being as fast, safe and consistent as I can possibly be but overall, am going to focus on having fun and taking the experience all in.
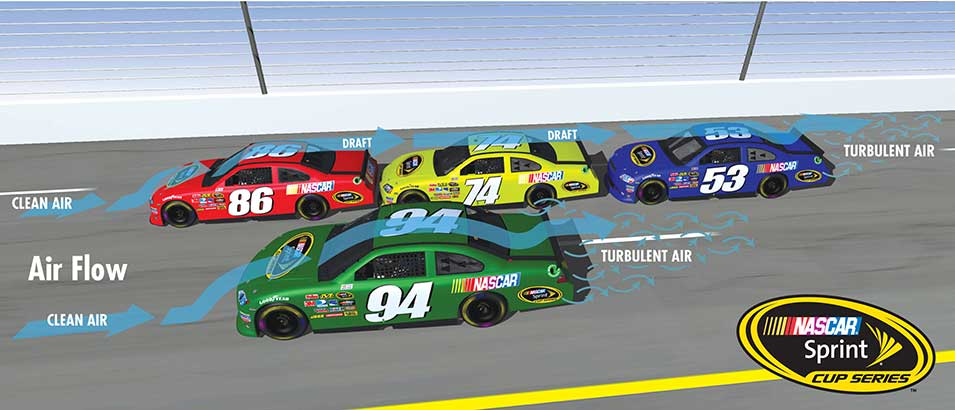
We’ve long heard and talked about drafting and bump drafting – how they can make or break a qualifying time, depending on what kind of car you are in and what section of the track you can catch a tow. The fundamentals behind a draft are simple:
The goal is to get from one point on the track to another point, as quickly as possible.
You can do that by slowing down less through a corner (carrying a higher minimum speed). This could be through having ‘better’ tires for better grip, adding downforce for better grip, braking less and/or getting back on throttle quickly.
You can also focus on accelerating faster between the two points by adding more power, reducing the friction on the accelerating drive-train (lightened flywheel, gears or driveshaft as examples), increasing grip on the tires that are driving acceleration OR reduce the forces that are barriers to accelerate through – such as the air itself (e.g. reducing down-force).
We’re going to assume that you are not in formula 1 or some other series that has active aero such as a Drag Reduction System (DRS), so the only option you have to reduce down-force is to have another car punch a hole in the air, for you.
I don’t get it – the air, is the air. Why does this matter?
For the uninitiated, let’s take a minute and explain why this is important. You know those videos of reporters that go outside and report on a big wind storm or hurricane? They go in front of the camera and try to walk against the wind and they get pushed back or can barely move forward. This is analogous to what your car is experiencing. The reporter is trying to walk against a 100mph+ wind and your car is trying to drive through the air, at 100mph+.
When the reporter steps inside from the hurricane, it is much easier for them to walk, jog, run and even sprint! The reporter not only moves faster but they use up less energy.
When a car is in front of your car on a race track, they are somewhat eliminating that “100mph” wind resistance, letting you step into a bubble of protection and as you get closer, that effect gets even stronger, making it almost feel like you and your car get sucked.
You gotta shake it, before you bake it!
Now we all know from the documentary/autobiography “Talladega Nights, The Ballad of Ricky Bobby“, that you can even use this to create a sling-shot effect. Where the trailing car tucks into draft of a car, gets sucked in and at the very, very last-minute pops out and can motor past the car that gave them the “tow”.
Ok but for reals now – here is the real thing.
This is used quite often in wheel to wheel racing conditions and sometimes, can be used in qualifying or time attack situations, when the stars align.
What does a draft look from the data perspective?
Below is a session from Spokane County raceways in June 2017. Spokane is an old school track with a very long straight away, 1,300+ yards long and in most cases, hitting near the rev limiter ( at the top of 5th gear in a PRO3 car. At least in a PRO3 car, after exiting Turn 8, it’s full throttle past three turns, before braking for Turn 2.
On this day, it was a dry and windy Sunday, with qualifying in the AM and temperatures in the low 70’s. I went out knowing that I had to setup to get my fastest laps in lap 3 or 4 – when tires would be in their optimal performance window. If I couldn’t get my target lap time then, I’d have to back off, let the tires cool off and have another go at it.
After getting things warmed up, I put together two flying laps where I felt like I gave it nearly my best and being one of only two people to get into the 1:37’s over the weekend lap time from Saturday.
Check out the gradual increase in lap time delta – usually evidence that one lap has a draft and the other doesn’t.
So, what do we have?
The purple lap is where I caught an ok but not great draft.
Towards the end of the green lap is when I started catching the cars in front.
Air Fuel Ratio seems to be about the same on both laps
At the start of the lap, there was zero difference in lap time.
As I start making it farther down the straight-away, the speed difference starts growing, reaching a peak of almost 2mph
By the end of the straight-away and right before the brakes were hit, the green lap was already .188 seconds slower.
I felt like I had left some on the able and backed off to let things cool down for a couple laps and setup two more laps, trying to catch a draft on those as well.
This time, with some video evidence! What happened:
The red lap ended up being faster than the green lap but that was with not much of a draft.
The red lap, I got a solid draft on the back straight away, where we’ll focus the analysis.
Like the previous lap, the difference in straight-away speed was between 1-1.5mph, through the whole back straight.
You can see the delta graph, where the green lap was shaping up to be just as good as the previous lap.
Engine RPM was also consistently 50-100 RPM higher for the green lap, indicating that the it was able to rev more freely with the lower resistance from the air.
Unfortunately, the car that gave me the tow on the back straight, also didn’t give me the easiest of paths to go through turn 4 (which is totally within their right) and that essentially killed the lap.
Conclusion: The draft is strong!
There is a ton of variables that go into determining the impact of the draft, such as the weather conditions, the track and the type of car. In this case, with a PRO3 car, which is more of an aerodynamic brick, having something else punch a hole in the air made a difference of .15-.2 seconds on each of the straight-aways.
I think that if I could have lined up a draft on both straights, it could have reduced each of those fast laps by another .2 seconds at least. How big of a deal is this? I lost pole position on both days but less than .1 seconds. In fact, in this video below – we took the video of the fastest segments from that session, stitched them together and this would have been a 1:37.437 – almost .5 seconds faster than the fastest lap and .2 seconds faster than my fastest rolling lap.
This has generally been what I’ve experienced at most tracks on the calendar because each as a decent straight-away.
Catching a draft in qualifying versus in a race is the same but it is very difficult to control this in a race. My suggestion is if you can, work with another driver and help each other out. Take turns having one car have a go at it and then switch, allowing that switch lap to when you let the tires cool down.
Working together is very common in karting and in light-weight and powered classes, like Spec Miata. In the future, we’ll do a write up like this with a spec Miata and looking at the quantified impact of bump drafting!