Posted on

Building a Sim: I Want to Drive Better in Real Life!

With the explosive growth of simulator driving for not just training but actual competition, big time dollars and rewards attached, we get more and more questions about how to get started building a simulator setup and specifically, what to get.

Still wondering if simulator driving is really that worth it?  Check out this podcast from Speed Secrets and this video about William Byron – now a driver for Hendricks Motorsports, who didn’t grow up driving karts or cars but rather, simulators.

This can be a complicated space because there are a lot of options.  In this second post, let’s go down one specific path base on what we think is the most important question.

Why do you want a simulator setup?  I want to use simulators to accelerate my driving or car in the real world.

eSports is exploding in popularity with games like Madden, Fortnite and Halo being at the center global gaming tournaments.  Gamers from around the world train and compete against world-class gamers at in-person and virtual tournaments all over the world and for real money.

This is not a spoof! That is a real picture of thousands of people watching gamers compete on-stage!

There are even several universities who have athletic scholarships for student-gamers.  Racing competitions in eSports is no exception – competing and winning real money for simulator driving is real and it’s here.

This post is focused primarily for those who want currently or are planning to drive in the real-world and want to use simulators to accelerate their development.  Getting to the track in the real-life to get quality seat time, driver coaching, and car development is not cheap.  Simulators are an excellent path to do all of those things more often, at a lower cost and increasingly with direct correlation to what happens in the real world.

Recommendation: Go with a PC-based simulator like iRacing, Assetto Corsa (PC edition), Assetto Corsa Competizione or RFactor 2.  Yes, Gran Turismo and Forza have had tournaments where the winners compete in real life for chances to be race car drivers as a profession but those are the exceptions.

It’s time to get serious with triple monitors and the very best components you can buy.

Things to get:

There is no way to get around it – this will be more expensive because you are trying to replicate real life, of which a lot of what happens in real life is about how the car and track sound and feel of your inputs.

  • A quality PC that can keep up with the display you want. The main thing here is a decent processor and ram but the beefiest graphics card you can get and the bar at this level is a little higher than at the ‘simulator only’ level.  Here are a couple options:
    • A PC desktop with a decent i7 processor, 16GB+ of RAM and a 6GB Nvidia GeForce GTX1070 or equivalent from AMD. Get the absolute best graphics card you can get – it will be worth it.
  • iRacing, Assetto Corsa, Assetto Corsa Competizione, RFactor 2 or Project Cars 2.
    • Yes, there are a ton more simulators out there, but these are the heavy hitters.
  • The best peripherals you can buy because you want motorsports grade hardware:
  • Display that will give you the best field of view (FOV) you can afford. Here are my preferences, in order:
    • 24”+ triple screens – I personally have an older version of this model but it doesn’t have pre-drilled holes for monitor stands, which sucks.
    • 27”+ curved screen
    • Virtual reality headset (e.g. Oculus Rift or HTC Vive Pro)
    • 40”+ single monitor/TV: this is not really an option. If you want to really focus on improving your real-world driving, you need an immersive experience.
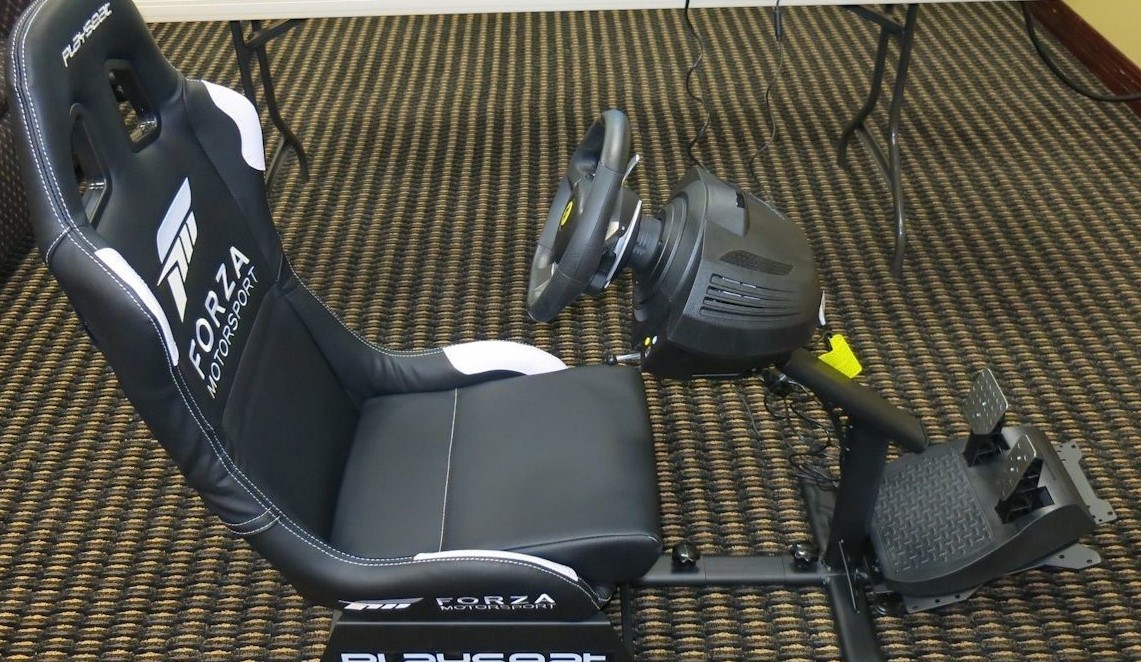
  • Sim rig with a seat
    • A sim rig/cockpit is no longer optional. You need the seating position, field of view and access to the driver controls to be as close to real-life as possible and you can only really do that with a proper and sturdy sim rig.  Here are a few options:
  • Motion platform
    • Yes, it’s now close to a requirement. Driving in race cars on tracks is a rough experience where you’re getting tossed around as you go over bumps and curbs.  The feeling of the car pitching forward when you hammer the brakes, the car getting upset as you take too much curb or the backend coming loose when you carry too much speed into a corner or get on throttle too quickly – you need to feel that.  All of those things in real life tell you what’s going on and they remind you of the mortal consequences of having more bravery than talent.
    • Want everything integrated and ready to rock?  There several companies who sell fully built and ready to rock motion simulators.  Here are a few:

Gama’s Motion Simulator

Pros:

  • There are few other things that will accelerate your driver development than quality motion simulator seat time.
  • The quality of your experience is completely dependent on the components you put into your PC and peripherals. If you want better graphics, get a better graphics card.  Want better FOV, change your display setup.  Want an even more immersive motion experience with real-time data streaming and coaching?  You can do that too!
  • The force feedback and vibration capabilities of the steering hubs and transducers on the market are amazing. You can buy components and configure then so that you feel everything on your feet, butt, abs, legs and hands as you do in real life.     You will have a generally authentic steering input and feedback experience.
  • There is a growing number of retail locations where you can rent seat time on very high-end simulators and get coaching from top-level coaches.

Cons:

  • No longer “welcome”, you are right in the middle of the slippery slope! It is now the cost of a small car to get a decent motion simulator up and running.  It starts in the $5-10k range and goes into the $50-75k range.  There are simulators well above those ranges but those are reserved for commercial applications.
  • Driving consistently well in a simulator is hard and even more difficult with motion. Most people are lucky to end their first 30 minutes in a simulator simply not crashing or losing control.  Stick with it!
  • Pretty much everything is more complicated to setup. There is almost no plug and play experience for any component.  You need to connect them, install drivers and configure/calibrate.
  • The physics and tire model are better than the console world but vary across simulator platforms.
  • There is even more you can buy, which can be good – for example, buttkickers are sound based vibration devices that give even more feedback to the seat, pedals and generally corners of the car.

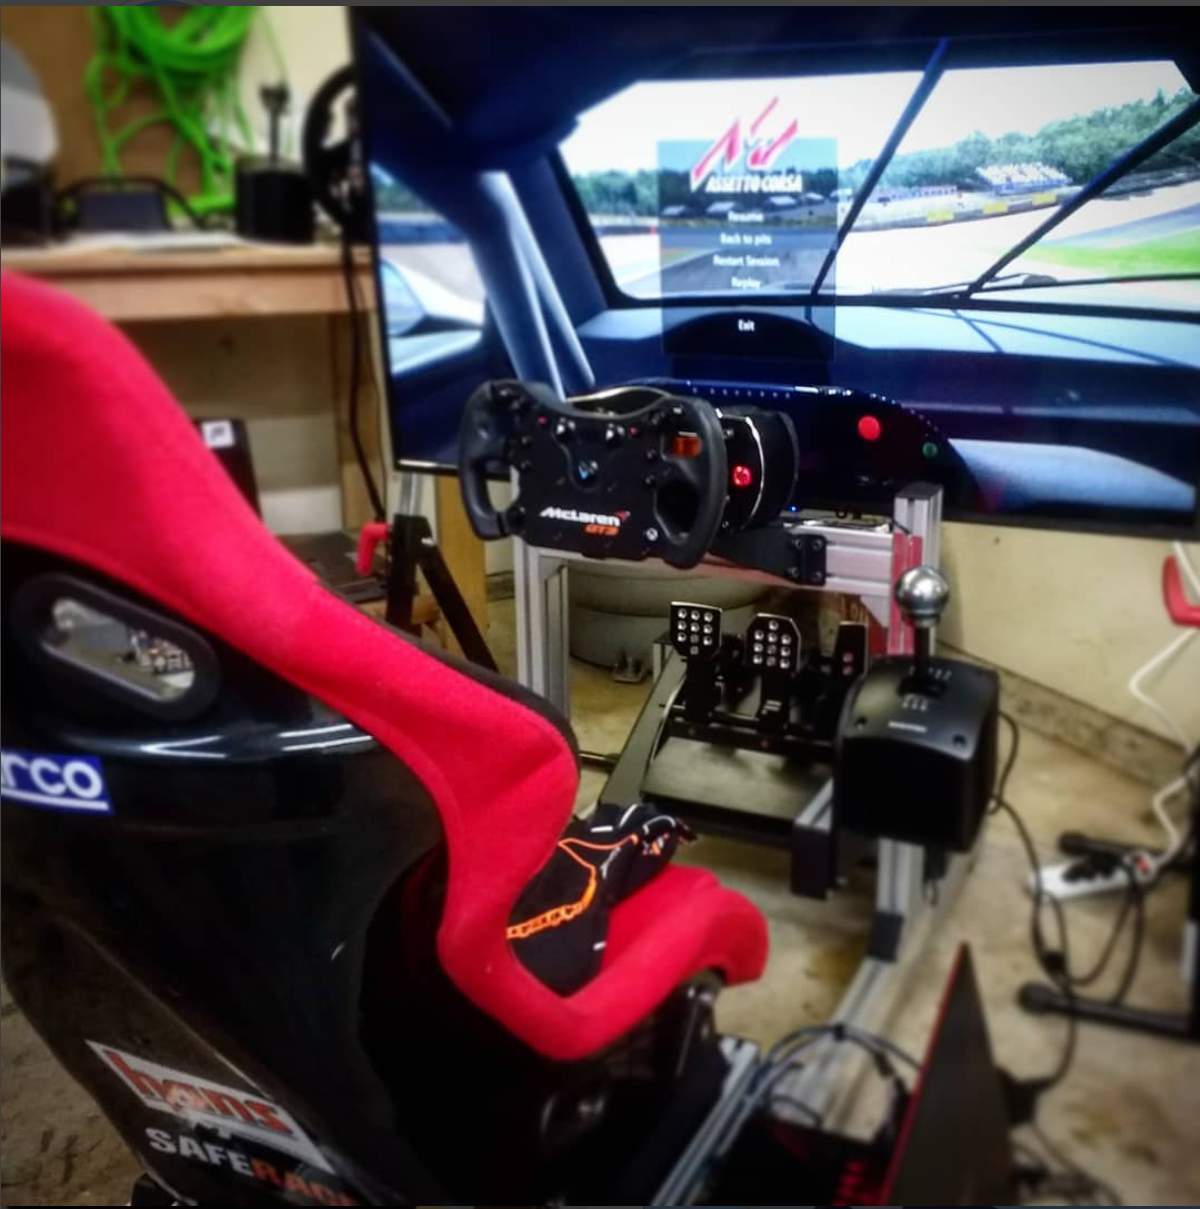
Example setups: I’ve only built one motion rig and would be considered “entry level” for a quality motion experience.

  • Example 1: Entry level, motion with a rig: Everything here is exactly what I have on my current motion sim but my graphics card cost a bit more a year ago than they do today.
    • Total Cost: $8,741.39 (doesn’t include taxes or shipping)
      • Custom built desktop gaming PC w/Nvidia GTX1080Ti: $1,200
      • iRacing subscription: $80/year
      • SimXperience Accuforce Hub and steering wheel w/button box: $1,299.00
      • Fanatec SQ Shifter: $199.50
      • Derek Spears Design (DSD) pedals: $895.00
      • OMP Racing seat: $799.00
      • Logitech 5.1 Speaker system: $49.95
      • Next Level Racing Ultimate Cockpit: $800.00
      • Next Level Racing V2 Motion Platform: $2,999.00
      • 3x AOC 24” gaming monitors: $139.98 x 3 = $419.94

If I knew then what I know now, what would I do differently?

The Next Level Racing cockpit is pretty good, and I don’t entirely regret my purchase decision, especially because their motion platform integrates seamlessly BUT if I were building another rig (which I will in the next 6 months or so), I would try the DOF motion cockpit because I don’t love the following about the Next Level Racing cockpit:

  1. The flex in the chassis, especially under heavy braking. First, it flexes and since it wasn’t designed to flex in the first place, the amount of flex is variable.  This isn’t great when you are trying to hit your marks lap after lap or making minor adjustments to brake application to shave off tenths of seconds.
  2. Lack of adjust ability. Having the seating position, steering wheel, shifter and pedals in the perfect position for your body is critical to driving fast and driving consistent.  Any unnecessary mental energy used to figure out where things are or having to adjust to not having the controls in natural/intuitive positions will make you go slower.  The NLR rig is essentially fixed in place after you set things up and for me personally, we had to add a wood block to the pedal box so that my heels could stay planted and reach properly.  The manual shifter position is okay, but I really wish I could move it another inch or two closer to me.  Lastly, with the motion set, the slider doesn’t work.

You listed the Fanatec pedals but you have some other fancy looking pedals.  What gives?

Yes, when the Thrustmaster wheel hub failed after about a year of use, I upgraded to the Fanatec hub but I wanted as close to the real-world race car pedal feel as possible.  On this rig I currently have the Derek Spears Designs pedals which are amazing and use real Wilwood racing pedal box components.  You don’t need these if you are only simulator racing.  I also have two other rigs with the Fanatec V2.5 Clubsport pedals, both the floor mounted and the hanging configurations.  They are solid and when you add the bump stops for the brake pedal, they are close to the DSD pedals but still substantially lower cost.


Posted on

Building a Sim: I Just Want to Have Fun!

With the explosive growth of simulator driving for not just training but actual competition, big time dollars and rewards attached, we get more and more questions about how to get started building a simulator setup and specifically, what to get.

Still wondering if simulator driving is really that worth it?  Check out this podcast from Speed Secrets and this video about William Byron – now a driver for Hendricks Motorsports, who didn’t grow up driving karts or cars but rather, simulators.

This can be a complicated space because there are a lot of options.  In this first post, let’s go down one specific path base on what we think is the most important question.

Why do you want a simulator setup?  I just want to have fun!

I want to have fun: Many people simply want to drive some awesome cars and a variety of tracks, without taking things too seriously.  You don’t care or want to bother with dealing with things like tire pressures, spring rates, shock settings, etc.  You want to jump into a simulator, start driving, sliding and maybe even trade some paint with others or barriers, on your own.  Best of all, it’s the cheapest way to get into simulator driving.

My brother and I getting some laps in on Gran Turismo.

Pros:

  • Console-based simulators are generally of super high-quality graphics in the cars and the tracks.
  • The tracks are essentially what they are like in real-life, it’s a great way to learn a track.
  • Tons of cars. Everything from high-performance street cars to Formula 1 cars.
  • The force feedback capabilities of the Fanatec and Thurstmaster lines are great and good, respectively. You will have a generally authentic steering input and feedback experience.
  • A great tool to focus on your getting your eyes to look far ahead and get ahead of what the car is doing.
  • Getting a console is much less expensive than building a gaming PC and the there are some lower cost peripheral options from Fanatec.  See our shopping list below, where you can get started for under $1k USD!

Cons:

  • Relative to iRacing, the quality of online racing against other real people is not great. People complain about getting crashed into at the rookie and lower levels of iRacing but online racing, outside of some of the bigger tournaments on Forza and Gran Turismo can be downright horrible.
  • The physics and tire model are simply not as good as iRacing, RFactor and Assetto Corsa.
  • Limited triple screen options. It is doable to get a triple screen setup but it’s much more complicated and expensive.  A better option would be a large curved screen or virtual reality headset.
  • Aside from the Fanatec Clubsport V2 and newer pedals, the pedal options are not great. Specifically, is the feel from the brake pedal.  Braking is what separates the good from the great and having a realistic and consistent braking feel is critical.  Most of these console game quality pedals have limited resistance and you essentially train your braking based on the position of pedal, not the pressure and feedback from the pedal.
    • There are options to add a rubber bump stop to the brake pedal (of which I did to my Thrustmaster setup) which makes things better but still not as great as some of the high-end PC only brake kits.
  • Quality – this may have improved but just simply the quality of the components is not great. I was using the setup pictured below to really work on my driving, so I was put on hundreds of hours on the components per year.  If I recall correctly, the Thrustmaster steering wheel base lasted just over a year before it just stopped responding one day.  That was when I decided to upgrade to Fanatec and shift to a PC simulator and iRacing.

Example setups:

  • Thrustmaster, Forza and Xbox One: This was my first “simulator” setup going back to 2012 or so. I felt a little intimidated with getting into PC-based stuff, so between a Christmas present from my in-laws, my wife and my own purchases, I had a decent Forza based setup.  I spent hours working on fixed setup time attach competitions, primarily in a Mazda Miata and trying to build the cars I had in the real-world, in the game (Mitsubishi Lancer Evoluiont 9).  All in, this setup cost about $1,200.
    • Total Cost (assumes you already have a TV): $1,428.76 + S/H + Tax w/PlaySeat.  Under $1k w/out Playseat.
      • Xbox One S Forza Motorsport Bundle: $389.99
      • Thrustmaster  VG TMX PRO Wheel, Base and pedals: $321.81
      • Thrustmaster TH8 shifter: $217.96
      • Playseat sim rig: $499
Yes, that is the pedal set taped down to the floor base.
Memories of me working my tail off to move up in the leaderboards.
  • For about a 3-month period I had a Gran Turismo and PS3 setup with a Logitech setup but it wasn’t any better than what I had with Forza so I sold everything off. Total cost was right around the same as the Forza.

Do you have an awesome console based sim set up?  Post some pics in the comments!

Check out future posts on two other paths:

  • I want to get serious about simulator driving: This means you don’t care at all or much about driving in the real-world. You are all-in on simulator driving.
  • I want to use simulators to help me be a better driver in the real world: This means you currently or plan to be driving on track in the real-world and you want a simulator to help with driver and car development
Posted on

Getting an FIA racing license

So you want to go ‘Pro’ racing?  Or maybe you want to have the license that gives you access to every regional sanctioning body in the US? Odds are, you’re going to need more than the regular regional racing license.  And if it is international competition, you’ll very likely need an FIA (Fédération Internationale de l’Automobile) racing license.  For the Creventic 12 hours of Imola race, that’s exactly what was needed, so here is what that experience was like.

What’s different between an FIA and a national/regional (e.g. SCCA/NASA/ICSCC) type license?

One major thing: FIA licenses are for experienced racing drivers, not just accredited racing drivers.  For just about all other racing licenses, you need to prove that you’ve completed a [insert level of quality here] racing curriculum.  You need not have actually completed many races or been ‘fast’ to get an SCCA, NASA or for me personally, ICSCC racing license.  This level of training shows that you have a base level understanding of race car dynamics, how event is organized, what the flags mean and how to be safe on-track.

From the application process for FIA, they have a higher bar.  They are looking for some level and amount of experience.  They want to know who you are as a racing driver, via the driver biography.

The second thing is the general global acceptance of the license.  At least within the US, if you have an SCCA license, it will be accepted at various levels by other sanctioning bodies.  SCCA being the most widely accepted, NASA following closely behind and more regional licenses also being accepted but having to provide more proof the further outside the region you go because there is a lower probability a licensing director has heard of the regional body.

Bottom line: When you have a valid, in good standing FIA license, you can pretty much race anywhere in the world.

How to get an FIA license: Step by step

Step 1: Collect these pieces of information before you start the application process

  • A passport compliant photograph of yourself.  It doesn’t need to be exactly a passport photo but must follow the general rules.  Here is a link to the United States passport photo requirements.
    • I used a head-shot from a photo shoot at work, cropped to be 2×2 inches or 51x51mm.  Make sure it is saved in .jpeg format for best picture quality.
  • A racing biography.  This was a little confusing as there is no standard template.  So I simply created a ‘resume’ style biography of my driving.  I’ve included a PDF copy of that below for reference.  It needs to cover things like how long you’ve been racing, what organizations, how many races, finishes, etc.
  • A current copy of a medical exam form for racing, that was completed in the past 3 months.  The FIA also does not provide a template, so I used the medical exam for used for an ICSCC competition license and that worked just fine.
  • Your credit card to use for payment.
Gamaliel Aguilar-Gamez Racing Bio April 2018

Step 2: Go to the US FIA Licensing website and fill out the application

  • Application link for United States based FIA licenses
  • Fill out the form.  The first section is your personal details.
  • Select ‘No’ for Have you had a previous FIA competition license.
    • Select and upload your racing driver bio document.  PDF format is your best bet.
  • The second section you should select ‘Competition License only’ and yes for the additional fee for International Competition Authorization.
    • Select Grade ‘C’ unless you are driving a GT3 race car or higher.
  • Upload your passport style photo and completed medical exam form.
  • Check the waivers and acknowledgements.
  • Click next

Step 3: Pay the fee

Yes, this is expensive and resulting in almost $500 USD.  The positive side is that this should be the only license you need if you compete in US national and regional club racing competitions.  You might still need to pay a guest fee of some sort but that’s it.

You will get a confirmation screen and document which outlines everything and even provides a handy QR code to track the progress of your application.

Summary: Simple and straight forward

I personally did not request the expedite service and in under 2 weeks, I got the license in the mail!

My license to kill… tires and lap times!

From the moment I first clicked on the link to apply for the license, to when I got the license in the mail was about 1.5 months.  This was because I had to ask questions about what does a racing bio look like?  What medical form should I use?  Then I had to make and get to a doctor’s appointment, of which was a little hard because work-life and life-life has been a bit crazy.

But overall, if you’re looking to do FIA sanctioned competition its not a difficult process to get through, especially with this guide.  😉

Let us know how it goes for you?  Did you have a different experience?  Have you applied for a B or an A license?  Share other driver bios!


Posted on

Post Session/Day Checks to Prevent a Wreck!

Gama pulling data from the morning qualifying session.  We took a quick look at it before the race, but he will use the data and video after the day is over to study to find more speed!

What:  Things you should do after a session and a day/event to help you get faster, keep your car running well and safe!

If I knew then, what I know now:  I would have learned how to review and teach data early on in my driving and racing career.  No other aspect can make such a drastic change in speed of the car and driver.


Post track or race weekend activities are or at least, should be part of the process. There is are many things to think and consider after you are done with your event. The same trains of though will transfer to whatever you are using as a vehicle. There are both personal and mechanical things you want to pay close attention to after your even. As I have gotten older, and been around the race track more I have learned that there is a full circle process for every event.

Post-Session starts well before the session – get in the right mindset.  A learning mindset.

Start with your pre-event inspection, do the event, then debrief and do a post-day inspect. It is great time to learn about yourself and your equipment. A track day should be considered a learning day.

Even if you are not with an instructor, and have done many days before, you should always be learning and absorbing. I have come to some of the best revelations in the hours and days after an event that have helped me be better at driving, as well as managing cars and equipment in the pits and paddock when I am crewing for the weekend.

Track days cost money so you should want to maximize your value and smiles per mile. I will go through some of the things to consider post event, as well as some things I have learned, even recently.

Your New Post-Event Checklist:

  1. Thank the organizer and those who volunteered their time to make the day happen!
  2. Inspect and load up your stuff. This is an important step! It seems like it is busy work, and you will be tired. But being clean and organized when packing up will pay off on the other side, I promise.
  3. Wipe your car down and clean it up before loading up on a trailer or driving home.  I’ve been doing this lately with our PRO3 cars because it does a few things:
  1. It gets the tires and bugs off before they have a chance to harden up.
  2. You are close to the surface of the car, and can see if there was contact with another car, the ground, flying debris… its racing, expect something weird to come up.
  3. You also get a good chance to get it back into the trailer and if you rub against it later it does not soil you with dirt (brake dust mostly).
  4. You can take a look at all of your wheels and tires and make notes if you have cords showing, need to swap a tire side to side, or have an issue with one or more of the wheels. A wheel can crack pretty easy if it is not a forged wheel.
A couple Subaru BRZ’s on a rack after a day of students sliding around the gravel. Each day, every car is inspected from head to toe, looking for broken parts and doing maintenance as needed.
  1. Check your video and data and make sure you have everything downloaded and set up to review later. Data review is a major tool for driver education and video is a big part of that as well. Depending on what you are doing, how far along you are and what type of vehicle you are using, data and video may or may not be an option.

We went karting the other day after the Pro3 race ended, and I have been watching video from that. We were not taking it serious, but we are all skilled, and have been around racing for a long time. We were going pretty hard, and I was able to learn some things reviewing video just the video.

That being said. I went and rode a dirt bike in the wild the other day for the first time, and I had no video or date to review. I used memory. There were many lessons of that day, and I have had to recall them one at a time. I went from riding in the yard, to doing multiple laps on the full GP/enduro course with a few hours of riding. Thinking about what did and did not work for me. Tips from those I was with (which was the biggest help for me that day) and memory of the events unfolding yield a vivid memory of what you can focus on for your next event. One of the things I try to practice any time we go use rental karts is to work with traffic, both quicker and slower than myself.

I have had video from the last dozen or so times I have done, and it has helped a ton. I can manage traffic much better now without loosing much speed. Having data and knowing how to read and interpret that information will be the single biggest teacher for driving a car. Gama has been 1 second quicker at both tracks we have raced at this year from last year – and his car is the same. He has been spending lots of time reviewing data, video and training.

Gama has a lap from last year compared to a lap from his last weekend at Pacific Raceways.  The car is mostly the same, showcasing what can be done outside of changes to the car to help you better yourself.  This compares a 1:37.761 from this year to a 1:38.215 from July 2016.
  1. Review and inspect your equipment/tools. You will want to know what is what, before you unload the car for the next event. As I mentioned before, I like to get the car cleaned and then loaded before we even get back to the shop. Once we get everything back to the shop it is time to go over your notes from post session issues, as well as from clean up and loading of gear.
  2. Clean wheels and tires of tire poopies. Tire shops really appreciate not having to deal with clumps of tire when trying to balance a wheel. You can carefully check wheel and tires for issues at that time.
  3. Check your other equipment and spares situation. You may not have broken something, but someone else may have and you may have loaned something you had. Keep track so you can replace it even if it was a give away item from your spares. Making good notes on all of this stuff will save lots of time when you need to order brakes, tires, fuel and the like for your next event.
  4. Making sure the trailer is prepped for the next event; spare tires and parts, tools, tents will make load in much easier for the next event. Just this past week we found that the batter tray in Manu’s Pro3 car had been ripped out by an impact from the car being off track during the last race out. It ended up stalling the car for this past race, but we did not send him out with a 80-lb cannon ball in the trunk of the car rolling around. So win there. We are going to correct the issue, and take the chance to freshen up some of the 10 year of add-on wiring that has collected in the car. This is why we check stuff, better to be safe and sound, than risk ANY thing or anyone out at the track. Remember step one! Most of the people keeping your safe are donating their time. Don’t endanger them!
  5. Check yourself. How did you feel at the end of the day. Were you tired? Did you have a headache on the way home? What did you eat for lunch? Taking care of yourself starts at knowing how you feel after your event. It sounds silly, but just stop and think about how you feel after your event. Even as your are driving home. What did you recall. If you cannot recall much at that time, then something is up. If you have a headache on the way home. It was not the fumes. You are dehydrated. If you are starving, your meals of the day, and days prior were not properly set up. Be very honest with yourself in this regard.

You won’t always be perfect but having this checklist will help, even for the experienced and pros.

Non of use Racers on Rails are pros, and we all make errors. The idea here is to find and share as many ways, in as many aspects as we can to help minimize yours. Just this year alone, I have been working hard and am in the best shape of my life. I have been mindful of food and drink, sleep and physical effort.

Our first race weekend was the 6 hour enduro. It was cold. and wet. We had a hell of a time with the weather during the day. We went into the race a little but “whatever” and it showed. The whole day I never drank any water and barely ate. We had our first stop which was all but a calamity, and I about lost my mind on our crew for being so sloppy. We weren’t that sloppy. I was just hangry. The next day I was trashed. I had a bad headache from being dehydrated. I was a mess. I have been racing, and endurance racing for 12 years. I know better. So I re-counted the day. What happened? What did I do?

It was a cold and nasty day at the first race of the season. Ill prepared, we paid the price during the race and the next day.

I started the day with wet feet at 07:30. Never drank so much as a bottle of water all day. Did not eat much – there was no concessions at the track due to low turn out and weather. It was just so cold and gross. We, me specifically. Never even thought about it till it was much too late. Lesson learned. You can also determine if you are driving yourself tired or not as well. Driving or being on a bike can be taxing on your mind. It will happen and you wont even realize it. We have found that most of our mistakes on test and track days happen in the later half of the day. Brain capacity and function starts to slow down, like it or not. Again. We are not pros (and even the pros struggle with this stuff too)!

A long day at the track in the sun where everything is shiny and cool can really tucker you out if you are not prepared for it!

Be sure to add post event check list stuff to your weekend round up. It is important stuff. You can get the jump on cleaning and repair needs. Replacement parts have maximum amount of time to be procured. If you are busted, you know ahead of time rather than after you unload at the next event and waste your time there! It is always about the complete package in a performance and race environment. Being complete in your process is part of that package. It is a little bit of time and effort now, or a lot later. Take what you see, learn from it. We all make errors. They are learning experiences. It is big boy and girl rules out there. Make sure you arm yourself with the best equipment, and mind to make good choices. People count on you to do so. Take care, take time, and always remember to have fun!

Posted on

Collateral Damage – Headlights

What: Stuff breaks when you go on track, this time – headlights and driver side mirror.

If I knew then what I know now:  Consider two layers of Lamin-x on your headlights and depending on your car, have a backup set of headlights.  If your OEM headlights are glass, see if there are plastic alternatives.

Check out:


Reality check – stuff will break

It kind of sucks but that is a fact of the track-life.  When you go on a race track, autocross course, rally stage, drag strip, etc. your car is going to be flying through the air at normally illegal speeds and changes in speed.

Bugs, rocks, small birds, rubber from tires and even parts from other cars will at some point, leave their mark on your beauty.  After this most recent race weekend at Spokane County Raceways, my headlights finally bit the dust.

Lamin-x, film, racing, headlights, bmw, e30
Doesn’t look too bad, right? Well the high-beams are duct taped because they were completely broken and the Lamin-x film was keeping the low-beams together.
an up-close look reveals a not as pretty picture. Eek!

The fix – new (to me) headlights and new Lamin-x

Although the remaining races for the year are during the day, we are in the Pacific Northwest and that means there is always a chance for rain.  When it rains, I prefer to have all the lights on, just to make sure other cars on track can see me.

To fix the headlights, at least for an E30, there are a few different options:

    • Replace just the light bulb: These light bulbs are old school and thus the whole light bulb and actual headlamp assembly are one-piece.  In most modern cars today, there is a headlamp assembly and somehow screwed to the inside, is the actual bulb.  So you can replace either the headlamp assembly or the bulb but we don’t have that option here.  To buy the integrated headlight, head over to Amazon and you can easily get one, like this one below (click on this link or the image below to go to Amazon and buy).  Each bulb will run you about $45/bulb.  Check to make sure you are ordering the right thing – the high or low beams.  They are not inter-changeable.  On the plus side, there are no side dependencies.  So the low or high beam bulb can fit on the left or right side of the car.
    • Replace the whole assembly: You can also choose to replace the whole assembly, which includes the bulbs and the frame that holds the bulbs in place and is screwed into the radiator support area.  Normally, this is too much for broken headlights but this is where eBay is your friend.  There is an option to buy brand new and even LED and projector headlight assemblies, which are awesome but pricey.  Here is an option from Amazon.  Beware though, these look awesome but are just as fragile as the OEM stuff.  Keep that in mind before buying and taking back on track.  🙂

Ebay to the rescue

As you can see from the Amazon search results, a new, truly new and even aftermarket set of the full assembly headlights can run $200+. Instead, I went to eBay and was able to find a used set of the full headlight assembly for just over $80. This is also less money than buying new (intgrated) bulbs and the already come in the assembly.  Click through the banner ad below to see search results that I used to get my new (to me) headlights.


Install in less than 5 minutes
Because I was replacing the whole assembly, all I had to do was:

  1. Remove 6 clips that pinch the headlight assembly to the grill that surrounds the headlights.
  2. Unscrew two screws for each headlight area, that holds the grill to the front area of the car.
  3. Unscrew two other screws that hold the headlight assembly to the radiator support.
  4. Disconnect the bulbs from the wiring harness.

And they’re off!

Out with the old, in with the new (to me)!

Lamin-x for extra protection

While the old bulbs were off, I cleaned off the new bulbs with generic window/glass cleaner and then installed a set of #prospec yellow tinted Lamin-x film covers.  These are the same ones I had previously but this time I put them all four headlights.  You can get these almost anywhere: Amazon, eBay or where I got them, ECS Tuning.  These are the exact product I ordered.  But since we fund this site through affiliate marketing, here is a link to Amazon, for the exact same product, of which clicking and buying helps keep this site alive.


Back to looking good for the next race!

In under 10 minutes total, including cleaning, taking pictures and moving slowly as I was recovering that day from minor surgery, old broken headlights were replaced with fresh, low cost, new (to me) headlights with extra protection from Lamin-x.

Back to looking fresh!

I think about headlights and even windshields as almost consumables. If I can go the rest of the year without having to replace them again, that’ll be great. But with the next race at Pacific Raceways, where there is gravel off-track and people love to drop tires, I’m not very hopeful.

The lights that will strike fear into my competitions mind and heart. Move out of the way!!!
Posted on

Building a track car – what to buy and what to upgrade when

What: Building a track car – things to consider and make sure you do when building your dream car for the track.

If I knew then what I know now: Power is almost always the last thing to focus on.  Most modern cars are plenty powerful enough.

Check out: These are some of the best bang for the buck items for your track day car:


So you want to go to the track and don’t have a car yet, but you want something of your own.  Cool, what to do now?  Here are some key variables to consider:

Overall budget

First thing your going to have to decide is how much money you want to put into this car, that you are realistically only going take on track a few times a year.  One major thing is, at the track things, can go sideways in a hurry. Always remember on any given day the track may consume the car, hopefully not you as well but we will go over that here in a bit. The main thing again is to have fun right?  If your scared of the car your driving, you may not want to build that car into a track car.

It’s better to drive a slow car, fast than to drive a fast car slow.

Something that was said to me early on in driving was “It was better to learn how to drive a slow car fast rather than be the guy that drives a fast car slow”.

Front-Wheel, Rear-Wheel or All-Wheel Drive?

Also what drive-train lay out do you want? A good rule of thumb is you should track something that has a similar layout to the car you drive all the time. This will best translate the things you learn at the track to the street. OK we have thought about the things above and some personal preferences as well, Time to choose a car.

E30 BMW 325is track car at PIR

I like to drive a slow car, fast type of a style.  Slow is also a relative term.  By modern super car standards a car like a 2002 BMW M3 would be slow with 333bhp and 3400lbs.  Think of that for a second, a Mclaren P1 has almost 1000bhp. Three times more! WOW.  That being said the BMW M3 is one of the most common cars around due to its chassis, motors, and driver feel.  Not just M3’s but most 3 series BMW’s are great track cars.  Porsche Cayman, 911’s of all years and 944’s also make good lapping cars.  Mazda makes a handful of great cars with good driver dynamics in both front and rear wheel drive. Honda’s, Toyota’s, Nissan’s, Lotus’, Ford Mustang, Gt86 cars, the list goes on and on but most (not all) of the car listed above don’t carry a large price premium to acquire.

You got your car, now what?

Once you found a car its time to take a look at it. A track car should not leak, squeak, rattle, hiss, buzz, clunk or shake. Any of these items will need to be addressed before even the first track event. You must have a reliable car to take to the track. Breaking down or oiling down the track doesn’t only ruin your day but all others as well do to lost time from cleanup and decreased track condition.

Car up on stands getting checked out before the next event.

Lets get it ready to go fast. What are the two most important systems in a car? Steering and braking. At a minimum the entire suspension and brake system should be inspected with a fine tooth comb. Replace any and all worn items. At this time depending on what is worn out an upgrade may get to pop in.

Lapping prep basics has taught me that having a set of track brake pads is the most beneficial item you can do to your car to make it last the entire day. Nothing worse than calling it a day because you used all your brake pad in two session. I would also try to do braided brake lines at this time as well. They just help with the pedal feel when you really get on it hard. I have always had great results with Performance Friction Brakes, Carbotech Brakes, Stoptech brakes, and Wilwood brakes for pads, brake lines rotors, and calipers. I could be happy with this prep level on a car. Driving a car on soft suspension and street tires with killer brakes can be a hoot!

Good pedal placement and a clean foot well can make heal toe shifting easier.

Brakes – check!  Shocks and Springs are next!

So you have done a couple days now and the brakes are good but you are gaining a thirst for G force. Whats next? Lets do some shocks and springs. I would suggest going with a coil over setup with a linear rate spring (most good kits are). Having a shock and spring combo that works together as one makes a car become so much more predictable. The build up to the adhesion limit is far less sudden in this case. Sway bars are a common upgrade as well. That being said a good coilover setup (read chassis tuning) may not require them. A lot of times I have put a stiffer sway bar on a car only to place it at full soft or in some cases remove it all together. I would stick with one step at a time on this one. Bushings are a great upgrade as well for chassis stability. Street cars are built to be quite and comfy. These rubber stockers allow some chassis parts to move a lot as to not upset the ride comfort. At the track this movement will cause the car to never feel like it really takes a set, always kinda moving around. In the past we have used Ground Control products, BC Racing products, Fortune Auto products, JRZ shocks, Motion Control Suspension and would not hesitate to use any of them for future projects.

A front E30 coilover assembly using a BC Racing shock.

The Meaty Tire Thread!

A set of good track rubber is always fun. A good set of R compound tires can up your grip game by a massive amount. The soft grippy compounds and large tread block size allows the tire to stick to the road once it gets to operating temperature. The tread blocks being as large as possible keeps the tire tread pattern from deforming or getting torn off as they pass there heat tolerance. This can have a side effect that can catch you off guard. The enhanced grip level means your speed is higher and your lateral load is higher and the then sudden loss of traction at the tire limit is much more dramatic than it would be on street tires. Most good tires do give you some warning before they will slide.

There is nothing that beats that grip though. Toyo Tires, Nitto Tires and Hankook Tires make good lasting, high grip, user friendly track tires. There are many others but keeping cost in mind these are what I shop for most of the time.  Check out Tire Rack for usually solid deals and good availability.

Nice big Toyo Tires Proxes RR track tire.

More Speed Requires More Safety – Don’t Skimp Out on Your Life

Well now the car has better brakes, an upgraded suspension, and we have some nice grippy tires. That means we are moving pretty fast now. One of the thing I have learned in my years going to the track. Safety is NOT over rated. The better the safety gear the better the chance you can walk away from a big one. Good basic safety harnesses do a great job of keeping you planted in the seat at the track. Even a set of four point belts with a stock seat can get you headed in the right direction.

Being able to stay planted in your seat with out having to hold yourself into the car allows you to have smoother, softer inputs that upset the car less in a reaction maneuver. Upgrading the seat to one with deeper sides and some better shoulder support just bring your stability in the car to the next level. A note to remember when shopping for seats. It is not recommended to run a fixed back racing shell without some type of rollover protection. In the case of a rollover a reclining seat is designed to fold/ break in a way to prevent the occupant from being crushed if the roof caves in.

Sorry if this is sounding a little dark but its the real deal. If you were in a rollover with a racing seat the seat would not fold and the roof would make contact and there is a high chance of getting crushed. A roll bar or roll cage is never a bad idea when going fast. I have run a rear roll bar and a race seat for years in my track car. Just having the piece of mind of knowing I have done the best I could with the budget I had, I felt as safe as I could be for the speeds I am driving. I am planning on installing a full cage in my car as the plan for speed increases.

I also run a set of six point harnesses, a Momo head restraint seat, and a Hans device attached to my Arai gp6 helmet. More on helmets later.

Fire is also a possibility. With increased speed comes increased stress and increased heat. There are many combustible fluids in a car: fuel, oil, brake fluid, gear oil, and that is just some fluids. A track car should at minimum have a small fire extinguisher. A complete fire suppression system plumbed into the car is best. They are not that much money in the grand total. Bimmerworld sells a kit for a few hundred dollars. When you have spent now thousands of dollars, it seems like a waste to have is burn to the ground because you didn’t want to spend a little more. Sparco, Momo, OMP, Schroth, Arai, Hans, Alpinestar, Adidas are all brands I would recommend.

A nice safe driver safety cell area.

How about that. Now we have a sweet track car. The car of our liking, the one that fits you like a glove, the one you have always wanted. It’s all leak free and reliable. It stops on a dime with the sweet brakes, it drive like its on rails with the tuned suspension, it has the grip from the sticky tires, and you have piece of mine being planted in your car with all of your protective gear keeping you safe. Now you can worry about you at the track rather than if the car can handle what your putting it through.

A super charged bmw E36 M3 track car preped by the Racer on Rails crew.

If you noticed I never got into adding power. The things above will make your car much faster than you think. Being able to hold a higher corner speed and have a shorter stopping distance will get you way better lap time results than just tossing horsepower at it. It all needs to work as a balanced package. Once you want to add power after your skills have bounded, a key item to remember is not to add to much. You don’t want to have more power than the car, tires, brakes, ect can handle. Back to the scary car thought. Its always easy to add more power to a car. So I say just roll it in rather than shoot for the moon.

Posted on

What to Wear at the Track

What: What to wear at the track – literally, everything, including underwear in some cases.

If I knew then what I know now:  I would be way more comfortable (and safe) at the track.

Check out:  Your local or online outdoors stores such as Cabela’s, Dick’s Sporting Goods and of course, Amazon.


There are two thing to look at here: Paddock clothing and driving clothing.

They are not really to many differences with paddock wear over driver gear. there are a couple specific items that are not good for both tasks. The major one is foot wear. Head wear is also greatly different. You should also always review your track event rules as well. Some clubs allow shorts and a tee shirt, while others require long pants and sleeves. Weather is also something to take into consideration. Never good to be caught in the rain with no coat. Layers are your friend. One other thing. your cloths will take a beating at the track and working on the car.

Checking tires on the grid before 25 hours of racing.

Outerwear

Pants, shirts, socks. I have found that most work wear and outdoors/ hiking gear translates well to the paddock and driving. Modern outdoors pants are great. A lot of them are made of a combination of canvas and fire hose. This makes them rugged and allows for an element of stretch to the fabric.

Pants – Outdoor Research is local to us and makes a product called the Deadpoint Pants that we have been using in both driving and crewing for a few years now and I am on the same pair. They also happen to be SPF rated for the sun.

Shirts are kinda open. Tee shirts are good for pit work in the paddock. They tend to get thrashed pretty fast. having a nice breathable over shirt is nice to have so you done have to look grunge all day. Again outdoor/ hiking gear works great and also available SPF rated.

Having good sun shelter for long hot days will help keep you from getting beat down by the sun rays – checkout our blog post on tents for more about shelter.

For socks we once again travel to the outdoors section for some Smart wool socks. The moister wicking and the thickness help you stay comfortable on your feet. Also with no synthetics fire risk is lower. There are lots of good company’s that sell great work wear and outdoor wear. Carhart, Dickies, Patagonia, Outdoor Reasearch, Filson, Outdoor Emporium/ Sportco, Cabels are companies I have used items from at the track for extended amounts of time.

Good gear makes working in harsh environment way easier.

Footwear: Good driving boots are terrible for standing around. Good shoes for walking and standing usually are cumbersome to drive in. It is best to bring two types of shoe to the track. If your not willing to do that you should find a shoe that works for you for doing both activities.

Places like Keen shoes, Lems shoes, Addias shoes, Piloti shoes make decent dual duty shoes. If you are hip to the two shoes shuffle then any shoe you find comfortable to stand and walk in is highly recommended. Remember to always take the weather into account, you don’t want to have wet socks all day.

Driving boots have a sole role in life. To give you the best feel to the pedals while giving you the best access for space in the pedal box due to the compact size without all that padding that makes your paddock shoes so soft. Being able to move your feet around help the ability to heal toe down shift easier, left foot brake, and get on and off the dead pedal better. Most are also fire resistant, not all but most. All the good driver safety gear company’s: Addias, Alpinestar, OMP, Sparco, Simpson, Momo, Oakley, and OMP and Sparco have budget minded brands like the OMP Sport line.

As you can see here both drivers and crew need fire resistant clothing sometimes.

Headgear. Another item that differs a lot depending on application. Lets start with helmet. There is one bottom line here. Don’t cheap out on your life. Get the best helmet you can afford. I tend to stick to a couple brands. I am familiar with their quality and fit. Arai is my absolute go to for motorsport driving. The way it fits and feels, the weight, the visibility works the best for me.

There is one bottom line here. Don’t cheap out on your life.

The others on my list (motorcycle, biking, ect) are Stilo and Bell helmets. You should make sure to try on a couple different brands. The helmet shell shape play a roll in how it may fit you. The brands listed above all sell different pad inserts to help them fit person to person better on most of the motorsports lines.

An associated item to consider is a head and neck restraint system. If you are running racing harnesses in your car this is a highly recommended item. They help support the weight of the helmet and limit the motion of your neck in the case of a heavy impact.

Hans has been the standard for years. Necksgen is another company that has developed a quality product. There are ones now that work with a 3 point safety belt as well. I haven’t tried one yet so i can’t comment on that yet. just remember safety is never over rated. As far as paddock gear goes again review the weather and think sun shelter. This is pretty basic, just trying to keep the elements at bay.

I love my safety gear!
Posted on

Day 0 – 30 Days of Racing in a Row Challenge

YouTube player

I’ve seen several articles on taking on a new thing by doing that thing for 30 days in a row, such as running a marathon (30 marathons in 30 days), stretching 10 minutes a day for thirty days, meditating, doing 15 burpees per day for thirty days and so on.

Why?

Usually it’s help start a new habit, kick a habit or accelerate development in something.  No difference here, I’m doing this to get faster and have fun!

The goal: 1 hour of racing per day, everyday, for 30 days.

While I wish I could race a real, physical race car  each day, I don’t have that kind of scratch or logistics setup but I do have a pretty sweet sim racing setup and iRacing.

So everyday, usually in the early AM’s, I’m going to practice and/or race on iRacing.  Through the next 30 days, I’ll also have at least 2 full race weekends where I’ll be racing in the real world.  So for those days, I won’t be on the simulator but instead on a race track, in my race car!  Yeah!

What do I expect to happen?

I’m not exactly sure but I am at least hoping to get noticeably faster in the virtual world, hammer out details on my sim setup and be better at learning to get fast.

To stay focused and reduce variables, I am going to focus on just one car and one track.  The Mercedes AMG GT3 and Road Atlanta.  Why?  Having a rabbit to chase.  I’m a huge believer and advocate in the power of data + video.

Literally thousands of virtual laps of this track but have yet to actually drive it.

Here is a good review of the car, right before it was released by the crew at Inside Sim Racing.

YouTube player

There is a new service that recently launched, Virtual Racing School, and while I’m new to it also, I am in love with the premise and potential of what they are doing.  With a simple download and activation, VRS logs all of your iRacing data and video and saves it to your profile.  No downloading, uploading or anything to deal with. Just install, activate, drive and you’re all set.

As part of the service, they also have data packs for certain cars and track combinations and even setups, that you can automatically use as a reference point to work towards.  This is massive!  Having someone else who is much faster than you, in the same car, same track and similar conditions is one of the best ways to learn and learn fast.

Getting ready

So I decided to start the journey, one day ahead and get my day 1 as smooth as possible.  I booted up my computer, installed updates to Windows, iRacing and NVIDIA.  My goal was to be able to simply wake up the next morning, do my morning routine and be up and running, in a race car within 15 minutes of getting out of bed.

I’ll create a post later on with the details on my current sim setup, so you all can get the full details then but at a high level, here is the setup:

So, while I technically have a motion simulator and I have an Oculus and have used them for iRacing, I will most likely not use them very often over these 30 days.  Main reason: we live in a tiny apartment and I’ll be doing most of my daily racing in the early AM, while my wife and 2 year are asleep, 15 and 40 feet away, respectively.  The motion simulator isn’t super loud but it makes noise and my wife has complained about it before.

The Oculus is AWESOME but I sweat easily and have found that when I’ve worn it for 20 minutes plus of intense driving, I sweat pretty bad and the lenses start fogging up.  So I’ll be using the triple monitors and headphones, without motion.

Posted on

Camping at the Racetrack

What: For those multi-day track weekends and trips, you don’t need an expensive hotel or RV.  Just camp at the track, even in the winter and fall.

If I knew then, what I know now: Never and I mean, EVER sleep inside of a trailer unless you specifically designed your heat source for the trailer.  Those things become ice boxes at night.

Products that made life easier in this post: 

  • Tent recommendation
  • Sleeping bag recommendation
  • Sleeping pad recommendation

Kick off to the sprint season

I have been around racing most of my life in one way or another. One thing that I see more in every type of racing than anything else is people camping at the track (what ever kind of track that is). I have camped out at many of the local tracks in the Northwest and some of the lessons that I have learned have come at both expense of self, as well as sheer trial and error. There are a few things to remember when planning to camp out at the track for the weekend. I will list a few based off of what I have learned over the years!

Standard two person setup for the track!

It’s going to be cold at night.  Period.

Step one is to plan for it to be much colder than you think it will be. When you are driving, or wrenching all day on a car in the sun (hopefully!) it is easy to forget that once the sun goes down, also does the temperature. I have had one of the worst nights of my life camping at the track. I had set up ‘camp’ in the trailer we haul the car in. I had my sleeping pad, bag, pillow, I was feeling pretty good about myself. It was mid-April in Washington, and the weather was particularly good for this weekend, with daytime temps almost 70 degrees. The overnight low dropped down to 33 degrees, and being inside of the trailer – with the void between the bottom side of the trailer and the ground, it effectively turns the trailer into a refrigerator. It was cold. I would have been better off on the ground! Car camping can have a similar outcome as well, but you can at least run the car if it gets too cold.

Trailers – great for storing cars and shelter during the day but ice boxes at night! Unless you prep it, DO NOT sleep inside them overnight.

Car camping – it’s like you drove your tent to the track!

I have car camped the past few seasons and have honed in a pretty comfortable set up for me. Everyone will have a different experience with their car, but if you plan ahead it can go well. This past weekend for example. We were racing in Portland, and I set up camp in my 4Runner for Saturday night. I have my gear bag, and duffel with clothes and layers set up with my random-bin on one side of the back of the car with the seats folded down, and have my sleeping pad, bag, pillow and extra blankets if needed on the other for sleeping on. I woke up in the middle of the night chilled even with my sleeping bag fully buttoned up. I grabbed a spare blanket I brought with me and ended up wrapping up the lower half of my legs and feet with it as a extra layer of sleeping bag and that did the trick! It quickly changed a cold night back into a night restful night with little drama.

That’s me car camping. That’s Gama ‘camping’ to the right in a slightly… bigger… uhm… car.

The facilities, you’ll need something or dig a hole.

One of the bigger things to remember when camping at the track, is planning for facilities, or lack thereof for bathroom breaks and showers. Most tracks will have some sort of hospitality building with bathrooms, but they are not always open all night long. Some tracks are basic, or still new and have only porta-potties on site – which can be odd at night if there is poor lighting. Most places are all paved as well, so the dig a hole method is not an option. For car and tent camping, having something with you that can be used as a fluid receptacle in the middle of the night will make yourself your own hero. Not having to bail out of the tent or car on a cold or rainy night to make a bathroom break can be a big positive impact on your nights rest. I usually grab an empty Gatorade bottle or something similar from the days work and pack it in the car before bedding down for the night. It has been a very positive addition to the track camp out!

Car camping at the Ridge Motorsports Park during the 6 Hour Endurance Race in April 2017. Don’t drink the ‘apple juice’.

The weather for day and night.

Planning for weather is also big. If you are tent or car camping your space is limited. Areas to duck out of the weather are few, and if a tent you can get flooded out quickly. In the Northwest weather can change by the hour especially in the spring and fall. We have raced in snow. That was a sloppy mess on all accounts. Rain is the main thing to be ready for. You want to be sure you have dry stuff to change in to, and a dry place to sleep. Sunshine can be just as big of an issue as well. A tent can get extra warm during the day if it is not left vented. It will also collect moisture even on a clear night, so you will need to be prepared for that.

Sideways rain and hail. Get as much protection as you can when camping.


You’ll still need to eat

Food and snacks, as well as drinks are important as well. For most weekends it is also pretty strait forward. A decent cooler packed well with ice can keep you in great shape for a 3 day race weekend with little issues. Depending on how much work or driving you do, hydration an and nourishment are paramount! Having snacks and non-sugar/sodium based drinks on hand are a great idea. It is easy to scarf a granola bar and little can of apple juice and a bottle of water on any 10 minute break. Having some cash for food that may be available at the track is also not a bad idea. Often there is concession stands, or outside vendors at track events. Food trucks are becoming more popular at events, but you should still plan to be able to feed yourself!

Rest up! Planning and actually putting in effort to get a good nights sleep when at the track is very important. In our early years racing when I was younger. We would stay up late, drink a lot, eat like crap and have a great time all night and then be tired and grumpy the next day when we should be having fun and getting serious work done on the cars. Getting a good restful nights sleep will help you stay at the top of your game, and help prevent mistakes from the track, to the paddock to loading the trailer properly to drive home to see your family or friends. Being comfortable is a big part of getting a good nights rest. Doing and planning for some of the things talked about above will help you maximize your experience at the race track. You can still be the best you that you can be while sleeping on the ground! It just takes the time and effort to zero in what works for you on each level of your needs.

Food, shelter, hole in the ground – we’re all set!

Take these tips. If you are also a hiker or hunter, just use the same level of prep that you would for a trip like that. Plan for a bit worse than you think you will see. Stay warm and dry. Get quality snacks, food and all the water you can drink. And as always, remember to have fun!

Posted on

Tents, canopies and shelter – how to stay protected on track!


What:  Having some ideas on what kind of tent may work for you and what you do

If I knew then, what I know now:  I would steer clear of Target/Walmart/Box-store tents all together at the track, they cannot put up with the use and abuse.

Product to check out: ShelterLogic – might not be as top of mind as the E-Z Up brand but solid product at a much lower price.


You should have seen that tent flying across the paddock! Pop-Up tents are one of the most necessary items to have in your track kit! It provides shelter, shade, support, and sometimes, even comic relief. Pop-up tents or E-Z ups as many call them, are the number one, most used and abused item at a track. I have seen my fair share hit the scrap heap for many different reasons. The number one reason is that you have to have one! There are a lot of options and considerations when it comes to tent. Hopefully I can help you decide on what might be best for what you are doing.

Got a team? 10×20 it is for you!

We have a nice custom E-Z up for the Track Attack Pro3 cars. It is a 10ft x 20ft unit that has a steel frame. It is a little heavy, but the quality is good and it is sturdy even in moderate winds. I personally like the 10×20 size for paddock use when at a race track. It allows for the car to be completely out of the sun or rain. It is big enough for a group to stand under during a long enduro race, and is only one item to load/unload out of the trailer for each race weekend. That being said. I am part of a team, and we have the luxury of having someone to help us most of the time when needed. Using a steel framed 10×20 EZ up solo is a bit of a tall order. Having a second person around is key.  It comes in an awesome bag that holds everything in place but man, it is heavy.  Probably around 60lbs total.

Nice big tent that can fit two cars sideways and one car, the long way.

Bigger than 10×20?  Yup!

There are larger sized tents as well. In 2010, when I was on the TC Motorsports Grand-Am Continental Tire team with our Boss Mustang, we had a really large one for the pro-race weekends. It was a 20×40 foot tent, and it took no less than 3 people to erect or take down. For long weekends, or if you have a large team to work with a tent this size may fit the bill well for you. Again, it is one thing to load and unload instead of many. The big tent had a home on our flat deck Taylor-Dunn pit cart when in transport. This was the best way to move the thing when it was packed up as it was very heavy.

20×40 tent!
The grip racing group has a full pro spec tent that connects to their hauler.

One-person operation? 10×10 is the way to go!

If you are a one man operation, or have a very limited crew to work with. Going with a 10×10 tent or even a couple of them is likely your best bet. They are the easiest to work with when alone. They generally package much smaller than the lager sized tents, and are usually light weight comparatively. They are also the cheapest option to purchase as well. For my 4runner, I am going to get a 10×10 to pack for camping, and track work weekends. It is cheap, easy to pack and use solo, and will provide with a bunch of extra usable space when camping at the track.

Several 10×10 tents, grouped together. A single person with two 10×10 tents seems to be the way to go. One person operation for carrying, putting up and taking down.
You can even get the tent material customized to really stand out, like this one from the Hard Motorsports team.

Tent pole material – it’s important

Tent pole or leg material is also an important choice. To be frank, the amount of times you use the tent, as well as how careful you are when setting it up or taking it down will have great effect on the life of the tent and legs. I have found in my experience that for consistent usage, finding a tent brand that uses steel legs and arms is better than aluminum. The aluminum tents are very easy to work with and move, but are quite fragile and the legs and tent arms are easy to bend and break. If you are doing just a handful of days per year, then getting two light weight 10×10 tents will be a good option for you. If you are putting in a full season, then they would be very much light duty for your needs! Again, I like a 10×20 size with a steel frame. Try and see what works for you.

Custom 10×20 tent being used by the Molly Helmuth racing team for Oval racing.

Securing your tent

Securing your EZ ups is an often over looked portion of your paddock set up for the weekend. I have seen dozens of tents fly away, get destroyed, or plain out just collapse because they were not properly addressed prior to something happening. Having something to weigh each leg down is the strongest start to keeping your tent in the trailer for a long time. You can use anything as ballast, but we normally use spare wheels and tires. They are easy to strap to, weigh a good bit, and are easy to move if needed. At night if we are leaving the car out, we will tie the tent to the car to keep it secure during the night. One thing to remember, is that if it gets really windy, as much as you may not want to take shelter down, it could be beneficial to take the the tent down. We have seen tents that are secured to trailers fly away, even lifting the side of a empty trailer in the air because it was acting like such a sail. Needless to say that tent was also destroyed, but it happened to damage that trailer, as well as dent a race car on the other side of the trailer as it flew. So be prepped for that!

Again, there is no right or wrong way to EZ up! You just have to determine what is best for you and your needs. If you are solo and need to be quick on paddock load in and out, then some light weight 10×10 options may be in your cards. If you have a friend to help, or maybe you are part of a team, then going with the bigger/beefier tents will be your call for sure (I would be worried if it was not!). If you are running with the pros… then you are paying for someone to handle this stuff for you! Get out there, get some shade and shelter for your day so you can maximize your enjoyment, and as always, don’t forget to have fun!